Fitting in the Whiskey strip of the closing strip on the bottom.
Tools:
- Adjustable Temperature Professional Heavy Duty Hot Glue Gun - http://amzn.to/2nSK3OW
- 3M #2060 Masking Tape: http://amzn.to/2CeLOdF
Please support the making of these videos through my Patreon site: https://www.patreon.com/NickSchade
Music:
Morning Mandolin - Chris Haugen Banjo Hop - Audionautix: is licensed under a Creative Commons Attribution license (https://creativecommons.org/licenses/by/4.0/) Artist: http://audionautix.com/
[Music]
good morning welcome back to the shop
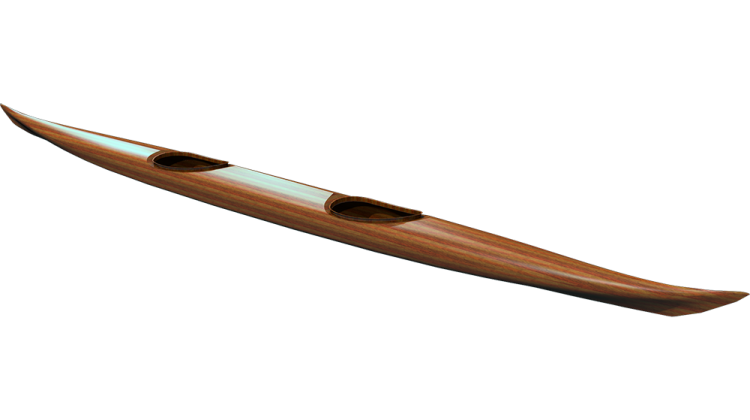
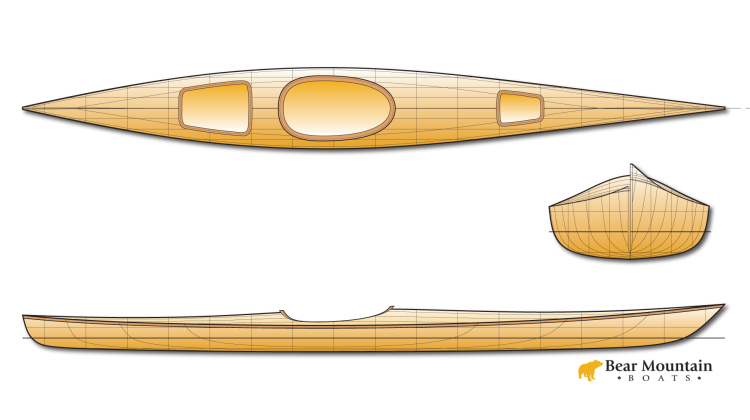
I'm Nick Schade and I'm building the micro
bootlegger sports strip built kayak so
far I've got the hull all stripped up
and what's gonna happen today is I'm
gonna flip the forms over and start
working on the deck the first step of
that is obviously just flipping it over
and then I want to break the strip's
free of the forms right now they're hot
melt glue to the forms to avoid staples
in order to make it easier to get the
haul off later I want to break that glue
joint and make it so the hollows free of
the forms so we'll flip the boat over
break it free and then start stripping
up the deck so the hulls potentially
gonna receive a little bit of rough
handling while I try and flip it over so
just is a little bit of reinforcement
I'm gonna run some filament tape which
is a fiberglass reinforced packing tape
just across the strips just isn't sort
of reinforcement I'll do it wherever
there's a form over here I set up some V
blocks on my saw horses this is a
place to accept the boat as I flip it
over I'll end up putting it back on my
external strong back system here before
I'm done but just for now but I can lift
it up put it someplace I have these B
blocks
I have here some inverse forms or
cradles to correspond to a couple of the
forms on the strong back so this is
would be form 28 or 28 inches from the
finished bow so we've got form 98 and
form 158 and so I'm just going to end up
screwing these down to the strong back
in their respective locations so I have
cradles to hold the boat securely to the
my working surface here couple cleats to
just a little bit of weather stripping
here which I'm going to use to cushion
top edge of these forms
it looks like it'll do just fine so now
I want to break the strips off the forms
I don't want to mess up the forms
particularly but I just want to make
sure that the glue holding the strip's
to these forms is broken so when it
comes time to get the deck off I only
need to worry about breaking the deck
free I will already have the hull free
so the first thing I want to do is just
make it to the forms of freedom moves so
the wedges are out the forms are free to
move now and then I'll just take lightly
tap the forms break them free
when I tap here I'm tapping towards the
wider bit so I'm not trying to force the
forms into a smaller part of the strips
which could split the tips apart once
the forms are broken free I can return
them to their original position by
inserting the wedges back in
I'm also going to cut the inner stem
here so I don't end up attaching the
Deccan Hall together of this piece
with the stems cut I can just double
check make sure the forms are indeed
free this end double check the other end
since the stern recurves forward this
part of the form is trapped in there in
order to get it out it needs to slide
forward and so I can't just lift up here
to break it free I need to lift up at
the other end
now after popping all that glue off I'm
gonna put a little bit of glue back in
but this time I'm just gonna be gluing
the top edge just to make sure these
strips tape stay tight up against the
forms these will be easy enough to break
out when it comes time so the forms all
flipped over and ready to accept strips
from the deck those strips were all
bundled up and prepared before we even
started on the haul and so now it's just
a matter of unbundling those and taking
one strip off of stack at a time and
adding it onto the forms see how far we
get here we have the material we set
aside for the deck got it marked
starboard port this is the part line
nine and nine with a circle on it and so
we just need to undo this wrapping so we
can get access to the strips
bringing this for a strip over here will
do the sanity check all right
part line part line starboard starboard
six seven eight nine so it looks like
everything's in the sequence it's
supposed to be and grain looks like it's
right orientation everything looks good
so quick dry fit here shows I need to do
a little bit of Robo bevel on here to
square up that top edge of the existing
strip
so I'm ready to put this first strip on
the deck the only thing that's different
here is I won't actually glue the bottom
edge of this strip to the top edge of
this strip that way when it comes time
to take the deck off it's not glued
together I will glue this strip to the
forms and some of these strips popped
off on the hull i'll riku them back on
and I will put a little spot of yellow
glue between the strip and the inner
stem so this does get clued to the inner
stem but it does not get glued to the
strip below it and again I'm lining up
my marks here to keep the grain all
aligned and we'll just continue with
that all the way up to the centerline
[Music]
[Music]
[Music]
like a lot of kayak designs micro
bootlegger sport doesn't have a defined
shear line I've created a part line
which is right here between these two
strips so I haven't glued between these
two strips and in the middle of the boat
that's the widest part of the forms it
doesn't really have anything going on
there it's just a smooth continuous
curve past that area I'd like to make it
so essentially that part line disappears
so in the finished boat you just don't
see where the hull finishes off and the
deck starts you know I've got a water
line here and I want to point that out
but I don't really need to point out
where the shear line is on the
traditional kayak the shear line is a
fairly distinct angle between the deck
and the hall and there's an obvious
transition from the deck to the hall
with this it's not so obvious and I want
to hide it so as part of that I
continued these strips rate paths
they're the same color strips starting
at the water water line moving up but
the other thing is since there is not
that to find angle there it's not very
rigid so it's it's pretty easy for these
strips to move one against the other and
so one is high then the other is high
and if I'm sanding making this a smooth
transition between this strip and this
strip can be a little tricky because
there's not much supporting it here at
the forum there's something supporting
it here at the other form of something
supporting it but here the this strips
can flex quite a bit so what I'd like to
do is put a little bit of a backer
behind that to help keep those strips
aligned and what it's going to be is
basically a couple little tabs of wood
one glued to the top overhanging into
the bottom another on the bottom
overhanging onto the top I'm going to
glue
on the inside so when you push on it
there's something bridging those two
pieces but I don't want to have the two
pieces bonded together that's why we'll
glue one to one side and the other to
the other side but by having those two
teeth hooked together it'll just give a
little bit of support so just get this
little short piece of strip here and the
part line is the third between the third
and fourth strip down one two three four
so right there and I'm going to end up
gluing this across like that and then
another piece right next to it so one
will be glued to the strip above the
part line yeah they will be glued to the
strip below the part line
and it'll go along the whole scene
between every form doing just that
so that'll just give it a little bit of
support when it comes time to sand the
outside along the part line
I'm gonna call that it for today I got
three strips up the side I get the
little teeth in there to hold this that
seam in alignment I flipped this morning
I flipped it over and got the forms
knocked free and so made good progress
today I think it's it's looking sharp
that dark wood that I've that I've used
for the side is the pattern starting to
come together I'm starting to see the
next mirror here and I think it's really
gonna look cool tomorrow will be just
more stripping watching a man stripped
and we'll see how far we get with that
the goal will be to get up to the center
line start stripping past the center
line on one side and then eventually
we'll end up marking that center line
trimming to the center line filling in
from the other side and we will also
mark this back deck shine feature line
and put a accent strip along there we'll
also put an accent strip on the center
line and we'll fill in this back deck
with that other wood I got which I think
will look really sharp so coming along
if you have any questions please post
them in the comments you know if you
watched all the way through this give me
a like if you're watching all these
episodes hit subscribe I've got a couple
books out about strip building boats and
despite the amount of information I'm
trying to put into this video I think
having a reference from those books to
see what steps and what a little bit
more why I'm doing things might come in
handy for some of you if you're
interested in the book there should be a
link down in the description until the
next episode thanks for watching and
happy paddling
good morning welcome back to the shop
I'm Nick Schade and I'm building the micro
bootlegger sports strip built kayak so
far I've got the hull all stripped up
and what's gonna happen today is I'm
gonna flip the forms over and start
working on the deck the first step of
that is obviously just flipping it over
and then I want to break the strip's
free of the forms right now they're hot
melt glue to the forms to avoid staples
in order to make it easier to get the
haul off later I want to break that glue
joint and make it so the hollows free of
the forms so we'll flip the boat over
break it free and then start stripping
up the deck so the hulls potentially
gonna receive a little bit of rough
handling while I try and flip it over so
just is a little bit of reinforcement
I'm gonna run some filament tape which
is a fiberglass reinforced packing tape
just across the strips just isn't sort
of reinforcement I'll do it wherever
there's a form over here I set up some V
blocks on my saw horses this is a
place to accept the boat as I flip it
over I'll end up putting it back on my
external strong back system here before
I'm done but just for now but I can lift
it up put it someplace I have these B
blocks
I have here some inverse forms or
cradles to correspond to a couple of the
forms on the strong back so this is
would be form 28 or 28 inches from the
finished bow so we've got form 98 and
form 158 and so I'm just going to end up
screwing these down to the strong back
in their respective locations so I have
cradles to hold the boat securely to the
my working surface here couple cleats to
just a little bit of weather stripping
here which I'm going to use to cushion
top edge of these forms
it looks like it'll do just fine so now
I want to break the strips off the forms
I don't want to mess up the forms
particularly but I just want to make
sure that the glue holding the strip's
to these forms is broken so when it
comes time to get the deck off I only
need to worry about breaking the deck
free I will already have the hull free
so the first thing I want to do is just
make it to the forms of freedom moves so
the wedges are out the forms are free to
move now and then I'll just take lightly
tap the forms break them free
when I tap here I'm tapping towards the
wider bit so I'm not trying to force the
forms into a smaller part of the strips
which could split the tips apart once
the forms are broken free I can return
them to their original position by
inserting the wedges back in
I'm also going to cut the inner stem
here so I don't end up attaching the
Deccan Hall together of this piece
with the stems cut I can just double
check make sure the forms are indeed
free this end double check the other end
since the stern recurves forward this
part of the form is trapped in there in
order to get it out it needs to slide
forward and so I can't just lift up here
to break it free I need to lift up at
the other end
now after popping all that glue off I'm
gonna put a little bit of glue back in
but this time I'm just gonna be gluing
the top edge just to make sure these
strips tape stay tight up against the
forms these will be easy enough to break
out when it comes time so the forms all
flipped over and ready to accept strips
from the deck those strips were all
bundled up and prepared before we even
started on the haul and so now it's just
a matter of unbundling those and taking
one strip off of stack at a time and
adding it onto the forms see how far we
get here we have the material we set
aside for the deck got it marked
starboard port this is the part line
nine and nine with a circle on it and so
we just need to undo this wrapping so we
can get access to the strips
bringing this for a strip over here will
do the sanity check all right
part line part line starboard starboard
six seven eight nine so it looks like
everything's in the sequence it's
supposed to be and grain looks like it's
right orientation everything looks good
so quick dry fit here shows I need to do
a little bit of Robo bevel on here to
square up that top edge of the existing
strip
so I'm ready to put this first strip on
the deck the only thing that's different
here is I won't actually glue the bottom
edge of this strip to the top edge of
this strip that way when it comes time
to take the deck off it's not glued
together I will glue this strip to the
forms and some of these strips popped
off on the hull i'll riku them back on
and I will put a little spot of yellow
glue between the strip and the inner
stem so this does get clued to the inner
stem but it does not get glued to the
strip below it and again I'm lining up
my marks here to keep the grain all
aligned and we'll just continue with
that all the way up to the centerline
[Music]
[Music]
[Music]
like a lot of kayak designs micro
bootlegger sport doesn't have a defined
shear line I've created a part line
which is right here between these two
strips so I haven't glued between these
two strips and in the middle of the boat
that's the widest part of the forms it
doesn't really have anything going on
there it's just a smooth continuous
curve past that area I'd like to make it
so essentially that part line disappears
so in the finished boat you just don't
see where the hull finishes off and the
deck starts you know I've got a water
line here and I want to point that out
but I don't really need to point out
where the shear line is on the
traditional kayak the shear line is a
fairly distinct angle between the deck
and the hall and there's an obvious
transition from the deck to the hall
with this it's not so obvious and I want
to hide it so as part of that I
continued these strips rate paths
they're the same color strips starting
at the water water line moving up but
the other thing is since there is not
that to find angle there it's not very
rigid so it's it's pretty easy for these
strips to move one against the other and
so one is high then the other is high
and if I'm sanding making this a smooth
transition between this strip and this
strip can be a little tricky because
there's not much supporting it here at
the forum there's something supporting
it here at the other form of something
supporting it but here the this strips
can flex quite a bit so what I'd like to
do is put a little bit of a backer
behind that to help keep those strips
aligned and what it's going to be is
basically a couple little tabs of wood
one glued to the top overhanging into
the bottom another on the bottom
overhanging onto the top I'm going to
glue
on the inside so when you push on it
there's something bridging those two
pieces but I don't want to have the two
pieces bonded together that's why we'll
glue one to one side and the other to
the other side but by having those two
teeth hooked together it'll just give a
little bit of support so just get this
little short piece of strip here and the
part line is the third between the third
and fourth strip down one two three four
so right there and I'm going to end up
gluing this across like that and then
another piece right next to it so one
will be glued to the strip above the
part line yeah they will be glued to the
strip below the part line
and it'll go along the whole scene
between every form doing just that
so that'll just give it a little bit of
support when it comes time to sand the
outside along the part line
I'm gonna call that it for today I got
three strips up the side I get the
little teeth in there to hold this that
seam in alignment I flipped this morning
I flipped it over and got the forms
knocked free and so made good progress
today I think it's it's looking sharp
that dark wood that I've that I've used
for the side is the pattern starting to
come together I'm starting to see the
next mirror here and I think it's really
gonna look cool tomorrow will be just
more stripping watching a man stripped
and we'll see how far we get with that
the goal will be to get up to the center
line start stripping past the center
line on one side and then eventually
we'll end up marking that center line
trimming to the center line filling in
from the other side and we will also
mark this back deck shine feature line
and put a accent strip along there we'll
also put an accent strip on the center
line and we'll fill in this back deck
with that other wood I got which I think
will look really sharp so coming along
if you have any questions please post
them in the comments you know if you
watched all the way through this give me
a like if you're watching all these
episodes hit subscribe I've got a couple
books out about strip building boats and
despite the amount of information I'm
trying to put into this video I think
having a reference from those books to
see what steps and what a little bit
more why I'm doing things might come in
handy for some of you if you're
interested in the book there should be a
link down in the description until the
next episode thanks for watching and
happy paddling