With the center accent well centered, it is just a matter of fitting one end of the strip and getting the grain alignment to match the other side.
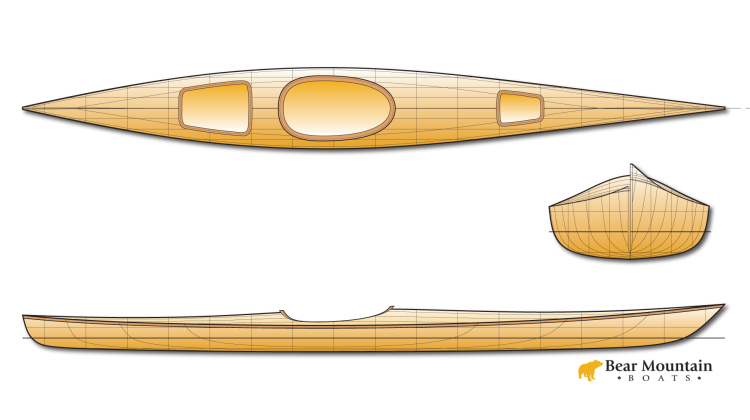
- microBootlegger Sport Plans
- Robo-Bevel
- Get the "Just Build It" T-Shirt
- Read along in my Book
Tools:
- Adjustable Temperature Professional Heavy Duty Hot Glue Gun - http://amzn.to/2nSK3OW
- 3M #2060 Masking Tape: http://amzn.to/2CeLOdF
Please support the making of these videos through my Patreon site: https://www.patreon.com/NickSchade
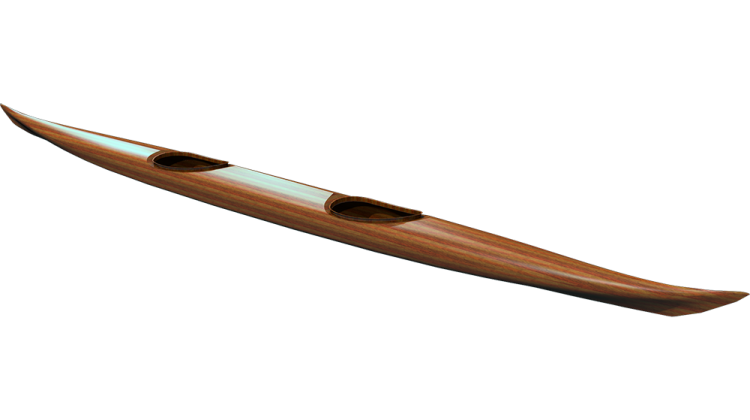
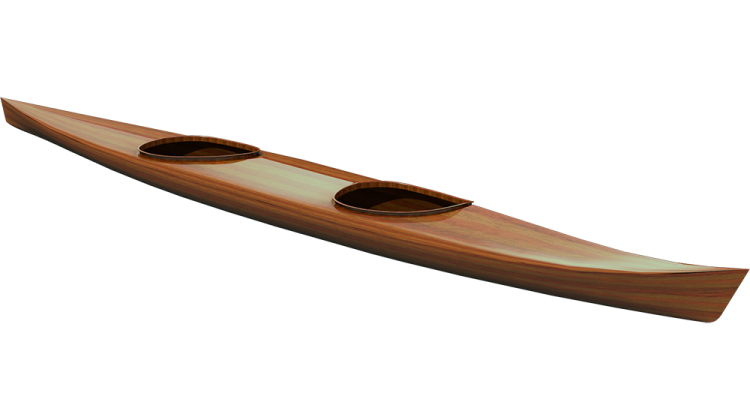
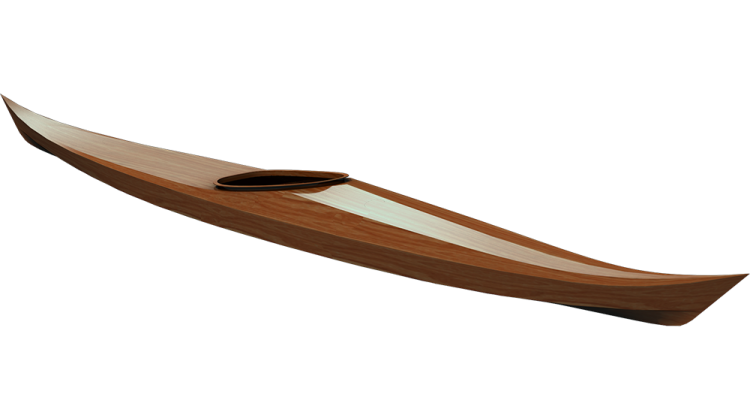
good morning welcome back to the
Guillemot Kayaks workshop i'm Nick Schade
in the last episode we trimmed out the
center line and installed the accent
strips along the center line and today
we're going to fill in them a remaining
side of the front deck so it's basically
just fitting strips at one end working
on getting the taper right and the bevel
right while maintaining the length of
the strips to the grain matches it's
just gonna be one strip after another
first strips will be the hardest and
it'll get a little bit easier but it
shouldn't be too bad we'll see how it
goes but that'll be the first step just
getting this bevel as close as we can
and then if they end up having to do a
little hand beveling in here at the end
that's what has to be done
so the strip only needs to come back as
far as the cock Tech and salt cut it off
right there you know it shouldn't end up
extending much out beyond the stand here
I was just cut a little bit off give
myself some room to work on the fit so
when the fit is right it's gonna come to
about there I might give this a little
pre twist just to make it easier to get
that fit right so the twist happens from
ear forward and twisting the top edge
job
yeah that's pretty well I'm gonna do a
little bit of hand beveling on the
bottom of that get a little bit tighter
fit on the bottom less than the
sixteenth of gap there hold this here
less than 1/16 that's good and tight so
now I'm gonna back it off a little bit
you might solve some Roma to make a fit
here the top edge of this strip is going
to fit up against the side of this
accent strip and it's gonna fit in there
at about this angle and the side edge of
that accent strip is just about vertical
so holding it at the angle we want the
but the strip to fit when we're done I'm
just gonna lift it up hold it like this
hold the plane about vertical to match
the strip that's fitting against this is
always a tricky fit on this first one
sort of the transitions from vertical to
horizontal here it's always going to be
a little bit tricky to get this fitting
up against that but luckily the outer
stem is going to end up covering over
part of this so if the that's not
perfect
it'll be disguised later on
fool the loose of the top tight at the
bottom so open up the gap a little bit
that fits not too bad I've got a little
bit of length available here for me to
move it forward playing back on a little
bit just maintaining that same bevel so
holding it flat against what I have
there take a little bit of off the toe
opened up the gap a little bit there so
I want to work on my bevel this way it's
a little open at the top so hold this
open at the top that's a pretty good fit
I'm gonna take a little bit more off all
right one thing that's clear here I
think this fits going to work fine but
one thing that's clear is if you look at
the next strip here I had a severe bevel
on this because the next strip comes in
almost flat it's coming in almost like
this and so this top edge of this strip
has a lot of bevel on it and I did it
here I used the Robo bevel because I was
able to just run out the end and Robo
Belleville fit in there just fine but
now you know obviously this big tool is
not going to fit in between the edge of
this strip and the edge of that strip so
what I think I'm going to do is just in
anticipation of having a big bevel there
I'm gonna work on that bevel now before
I install it and that way I'll have an
easier time getting in there it's just
gonna be an estimate on what we're
looking at there with the strip coming
in at about this angle you know we're
looking at a bevel there's almost a 45
degree angle on that I'm gonna take this
way back
so now it's going to be an easier fit to
get the next strip in between this edge
and that edge that's where the strip has
to go is in between here it's not going
to want to rise up over the top of that
just trying to anticipate what that next
strip will want to do in there so you're
going to call this fit good I have room
to plane away after this is done there's
enough material there that if this isn't
a perfect match at this point I'll have
material that I can play in a way at and
sculpt that a little bit to make it a
nice pleasing shape when it's all done
glue this strip in and you're ready for
the next trip
back it off a little bit deeper comes
back to about their mark that taper I
generally don't like using you utility
knife for trimming this taper I just I
forgot my regular old Swiss Army knife
since the blade of the utility knife is
so thin it's easy for it to sort of get
caught in the grain and follow the grain
and steer itself in an unfortunate
direction like I said I don't typically
use a utility knife but so I was going
slow there just to make sure I didn't
get thrown off course so it'll fit in
there like that at an angle something
like that hold that at the angle we
think it needs to be hold the plane at
the angle to match the edge of the
accent strip there
if the strip's flexing away and making
it hard for it to be planed I'll back it
up with another strip so it's open at
the bottom it's opened at the top and
it's tight here at the heel so the first
thing I'm gonna do is give it a little
bit of extra bevel on the bottom edge
you know I did pre bevel this edge here
and I could come in with my side rabbet
plane and adjust that bevel a little bit
but it's hard again to get all the way
in to the ends here it's easier look at
the edge of that and say okay how much
beveling do I need there not a lot
I've been getting a tighter fit their
back here needs more babbling alright so
we've got a better fit along this edge
now let's look at the top edge again so
again we're a little tight there a
little bit open at the top so I'm gonna
open it up at the top a little bit take
a first few strokes down here where it
was tight and then go with longer
strokes yeah it fits good there it's a
little high here I'd like to nestle this
strip down between the accent strip and
the prior strip so that'll be shaving
off the toe of that a bit so now it fits
down deeper into that lengthwise use our
marks there and there so I'm gonna move
it in that punch so full length strokes
again this tip is a little flexible but
you know I did three or four strokes
there and I've moved in a fair amount
and right there this time compared to
there again that's tips been flexible so
when I try and play in it it just size
away a bit so it's not getting full
planing so this is risen up a little bit
more so we'll concentrate on hitting the
tip a little bit more and we'll try and
support it it's at tip down a couple
more full length strips here
alright last time we were here now we're
there so I've gone in another these
sixteenths still need a little bit more
on that tip to get that to nestle down
in there better so that didn't affect
the length any it just got the tip to
settle down in there a little bit more
moved from here to there
all right
that's a passable fit in there I'm just
gonna tweak the fit up here a little bit
a little bit tight it right in there
again when I go to glue this bevel up
here I'm not going to go all the way to
the heel because as I slide it in
that'll smear glue on that edge and I
don't want glue to interfere with the
next strip
all right the taper looks pretty good
it's a little bit open at the top so
that means I will hold the plane a
little bit more open at the top and Mark
is here here so a little bit open at the
top
pulling strokes to maintain the taper a
little bit tight right there think I
want to bevel the bottom edge of this a
little bit tight there a flexible tip
off and causes an issue a couple extra
strokes down here to make this support
strip stay holding the tip a little bit
better and just take a little scrap
piece of strip here set it on the side
here so it's sticking up ever so
slightly and same on the other side that
way those little tabs hold the strip
there while I'm planing on it I'm just
playing through them if they're in the
way and you're still tight at the tip a
little bit tight at the heel a little
bit more gap in between so I'll give
each end a little bit more effort our
line that's to about there and you're
still a little open at the top so I'm
gonna open up my bevel a little bit so
tight against the edge and then open it
up slightly at the top you can a little
bit tight at the toe so it's not getting
tight in the middle we've got
still a little bit loose right here
tight tight so work on the ends it's
very good
all right it's tight at the toe loose at
the heel so I'll work on the toe first
it's actually tightest right in there
and it's running a little tighter
reading this section than it is at the
ends
our grain alignment is from here to
there so we've got a few more swipes
left it's still a little bit loose right
there
Titus they're a little bit loose at the
heel or it's a toe all right we're down
to from there to there
again when I'm fitting these I want to
be careful that I don't just wedge the
piece in there seemed like the easiest
way to get a tight joint it's just push
it harder but what happens is you can
displace the centerline and end up
getting a little bit of a wavy line
there so the goal is to make it so the
strip slides right in and stops where it
needs to be without putting a lot of
pressure and to get it where you want it
I'm doing pretty well in lining up the
edge of this strip side-to-side this
strip ends right about there and this
one ends right about there so we're off
by an eighth an inch that's that's
pretty good
it's a pretty nice fit all away you
still have this much to go from here to
there alright so last one was there an
hour to here from here to there and I'd
say we're a little bit loose right there
nice and tight right there slightly
loose with the toe we want a plane where
it's tight first start it out there and
here really tight in here right there I
mean the grain alignment wise we're
right to here so we've got another half
inch you did a pretty nice fit all the
way along I think it's coming through on
the video here you see this dark grain
pattern here we've got it mirrored here
if we align perfectly we'd be like a
quarter inch off and here we're like
three quarters so you know we're getting
that grain to align pretty nicely so now
we're loose at the toe tight right there
so we can I've been concentrating on the
toe a little bit so now we'll back off
on that and work on the
good another quarter inch of length and
it's still a little loose here nice and
snug there
and I'll give it one more swipe to the
pet plane here that's pretty darn good
and again zooming in on the green here I
think we've got a very nice match
between this grain and that grain so
presumably it matches all the way across
but that's the effect we're going for
and again the end of this taper is right
about there the end of this taper is
right about there so we're pretty darn
close and one of the advantages are
throwing an accent strip in here is it
separates the points here ever so
slightly so it's just harder for the eye
to tell if they're lined up but again if
we've got the grain here lined up really
well that's gonna draw the eye a lot
more than exactly where the tip of this
strip comes in versus the tip of this
strip so we're ready to glue this one in
and tape across the center line get that
seem nice and tight now I'm moving fast
enough here that the hot melt glue is
not really setting up by the time I want
to take the tape off so I can actually
leave the tape on while I'm fitting this
strip I might take the stuff off here at
the end just so I get a better idea of
how tight the fit is I can leave it on
here until I'm ready to apply glue the
Robo bevel is no longer fitting into
this base so I'm just putting a very
slight bevel on by hand using a block
plane on the edge of the new strip and
that'll just help me get a tight fit
there
so this little support jigs getting
chewed down as I playing the tape or
down on the strips I'm fitting I end up
planing into this little jig so
eventually it gets to the point where
it's sort of the supports are in the way
and it's just not working so well so
let's make another one
so we're down to almost last strip here
and if you remember when I stripped up
this side of the deck
here's strip 26 which was the last
designated strip for the front deck and
here's strip 26 on this side and then I
used sort of the scrap end of 26 and
strip 25 down here and so you see this
little wedge right here - there is all
that is included in that low but in this
strip 25 and as I say I'm quite certain
that the cock that comes out of
someplace - here I'm not gonna bother
with this strip again I'm just gonna fit
this trip here's the cutoff end of strip
26 on this side and here's the other end
of strip 26 so this is this piece off
the end of strip 26 right there so I'm
gonna end up lining up the ends down at
that end so I'm cutting off a piece here
that's the same length as what I cut off
here it's not that critical but just to
try and be consistent so this is a piece
I'm gonna try and fit into this spot
here approximately match the pattern
there
all we're gonna end up seeing is this
when it's all done probably is just this
bit from there to there and so if we
have something that matches up halfway
respectively here you should be okay so
the taper comes back to about there
that's a good long taper there
fling down towards that line all right
so it's tight they're a little tight
there this edge here actually has a very
slight curve to it I'm going to be
planing this edge into a curve in order
to fill this gap here so
it's a little open at the top so I want
to give it a little bit of a bevel
all right so that's the front deck all
stripped up got the accent right down
the middle I did a good job of lining up
the points of the strips and you can
start to see that book matching
happening here when I get the tape off
it'll be more clear but I think it's
looking pretty cool what's gonna happen
the next episode is I have the back deck
left to go and so it'll be trimming
along the feature lines there I have a
couple choices of strips in order to use
on the back deck so I'll lay those out
take a look at them see what I like and
I'm really looking forward to that
that'll be dripping all done I'll be
using wider strips in the back deck
together so it'll go pretty quickly I
think it's really gonna look sharp I
will end up putting an accent stripe
along the feature lines back there just
to have a separation between the side
and the back deck and so that should
look pretty sharp as well so if you
learned anything out of this episode
please give me a thumbs up if you're
enjoying this series please subscribe
I've got books about the process you can
buy plans for all my designs so this is
a micro bootleggers sport I've got plans
available for this if you want to build
it my last build the petrol play I've
got plans for that and there are also
kits available through Chesapeake like
craft your if you're interested in
building a cat all of those things
support me help me keep producing these
videos I really appreciate any support
you can provide so until next episode
thanks for watching and happy paddling