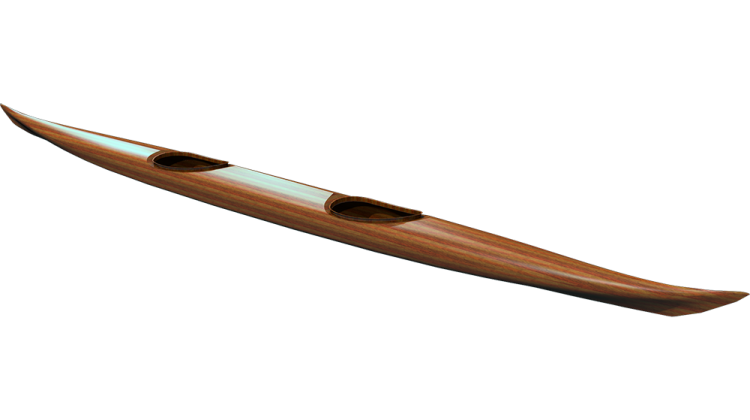
Fitting the final strips on the back deck of the microBootlegger Sport.
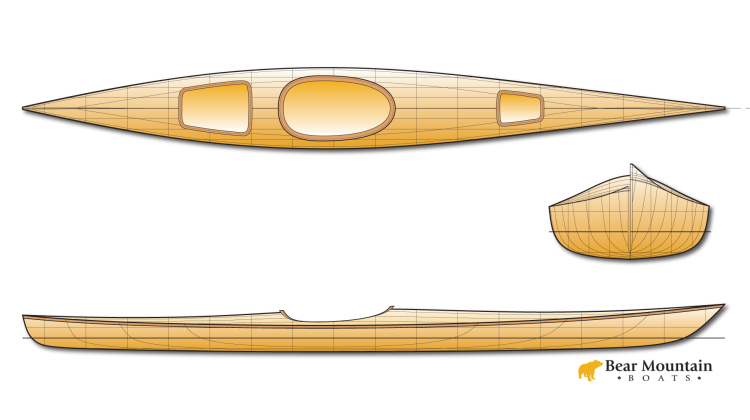
- microBootlegger Sport Plans
- Robo-Bevel
- Get the "Just Build It" T-Shirt
- Read along in my Book
Tools:
- Adjustable Temperature Professional Heavy Duty Hot Glue Gun - http://amzn.to/2nSK3OW
- 3M #2060 Masking Tape: http://amzn.to/2CeLOdF
Please support the making of these videos through my Patreon site: https://www.patreon.com/NickSchade
I'm down to the last bit of stripping hi
I'm Nick Schade at Guillemot Kayaks I'm
working on the last bit of stripping on
the micro bootlegger sport and that's
the back deck yesterday I trimmed off
the feature line and put an accent strip
in and I started sorting through the
strip's but of course I neglected to
have the microphone on when I was
talking about that so I'll give a brief
overview of what I did yesterday as far
as organizing those strips as you may
remember I cut some inch and a half wide
strips from two by material way back
when when I was ripping the strip's so
at this point I've selected which set of
material I'm going to use on that and
I've selected out a set of strips and
I'll just briefly go over what I did
there and then from there it'll be
fitting those strips into the back deck
and seeing how they look
yesterday I measured the back deck and
determined that I have 18 inches of
width and 67 inches of length that I
need to cover so what I have here is
some of my western red cedar strips
again cut out of a two by material and
these I've already booked matched them
and so I've got this little pattern
going on in here I don't know if it
shows up in the video this a little bit
of squirrely grain and then some nice
streaks running down here and I think
this will look pretty cool up at this
end I've got some little flaws and those
in the strips and I don't want to deal
with though that flaws so I want to keep
those off the bow so I'm going to cut
the strips off about here
then use the material going back from
here and my thought is instead of just
doing a straight book match and slip
match where so this side is a mirror of
this side and then these strips came off
in the order approximately like this and
then there slip matched so just going
down the line like this slipping one to
the side as it came off the plank when
I'm thinking I'll probably do is offset
these so as I have the triangle in the
back deck of the boat essentially and so
we've got these tapering sides and if I
cut it off right here and make that the
point of the first strips so down at the
very stern then it'll come back at a
diagonal like this and then if I offset
this so this point is right at the same
place on both sides
these will match each other and the wood
pattern grain pattern you see in here
will be offset down based on the
diagonal shape of that back deck and if
I continue to do that with each strip
moving it down and offsetting it based
on the diagonal triangular shape of that
back deck I'll end up with a pattern
that has this v-shape in the grain so it
will mimic the triangular diagonal
pattern of the sides of the back deck
it's a way of sort of enhancing that
shape or pointing out that shape through
the use of the grain I'm still book
matching this trip mirrors this trip
this trip here is this trip the strip
muse this trip by not perfectly slip
matching it straight out but instead
coming out in a diagonal will end up
getting a v-shape pattern there which I
think will look pretty cool so that's my
current plan so I've got that all set up
I think the first step is to just bundle
these back up and cut them off all to
length so I have them all starting at
the same place so I've got them all
bundled up and I'll cut them right off
at one spot here but before I do that
I'm just going to bundle up the scrap
and so those will be held in the useful
order for a possible future reference
now we'll just saw these
I won't cut these any shorter they're
longer than I need I need 67 inches and
these are 90 inches so they'll end up
being cut off shorter than this but you
never know what might need that length
for so we'll just start with that I will
undo the bundle here some reference
lines to help determine things here and
this is strip one two and we will grab
the center strips here so these two
strips open up like that and run right
down the middle to the cockpit which is
right there just cut them off so
obviously this tools not quite beefy
enough to cut through those wide strips
so the other way instead of using those
loppers I just sweep halfway through
with the saw I can break them off right
at that curve I'm not cutting all the
way through I'm just cutting parts part
way through and then break them right
there so these are gonna be right in
there right down the center line as we
move down the center line here we've got
a little bit of a crown to the back deck
and so we need to bevel that just a
little bit to get
the tight fit as it gets back to this
very stern it's going to be more V or
more crowned back there and these wide
strips don't really want to twist very
well on their own so I'm going to give
them a little bit of a pre twist to make
it so I get that slight V I want right
back there so this one's going to twist
up this way that one's going to twist
that way so let's just bring this over
here and we want to twist it back
probably about that far
Nexen I gave it a little twist saying to
the other side
no it's like fairly close match
now with these strips running straight
down the center line just work on the
bevel so holding these at the angle
they're going to be installed on the
boat I'm just going to hold the plane
vertically and remove the edge and
likewise with the other piece down here
and the forward part of the back deck
the crown is very slight it doesn't take
much beveling so it goes really quickly
as I get down towards the end where I've
got the twist in it I'll need to take
more on the trail looks tight on the
link so the next step is generating the
taper here I want the same on both sides
so it's going to be right in there
that's where it crosses over the accent
strip
just connect that mark with the end of
the strip on the other side now we'll
cut off that excess now they planed down
towards the line and we have a bevel on
the top edge of the strip here this is
beveled it's angled in like this so hold
this strip in the orientation that's
going to be on the boat and then I'll
hold the plane parallel to that bevel
line right there and start working this
down towards this marked line so start
and I'll do the same on the other side I
want these chips to mirror each other
I want the tapers to be about the same
so they end up ending at the same spot
and I want to make sure the grain lines
up these are the two most critical
strips as far as that goes on the back
deck because as soon as we get to the
next strip they're going to be separated
by three inches these are each an inch
and a half and so this point over here
versus this point over here are going to
be three inches apart so it's not that
critical that they be perfectly lined up
because it's going to be hard for the
eye to gauge whether they're a little
bit off but we want to start as well as
possible to have the best chance of
having everything line up exactly the
way we want it when it's done again I'm
holding it in the orientation that's
going to be on the boat I'm holding the
plane parallel to the bevel against that
accent strip approximately and now I'm
going to plane away
now we can just try our first test fit
here that these reference lines lined up
there and slide it up into place not a
bad first effort we've got quite a large
gap here tight back there the bevels a
little bit off we do want to make sure
that these strips are running straight
up the center line
if the strips aren't running up the
center line so the center line it's
right here if it's off to one side you
know here we're exaggerating it a bit
but obviously it's gonna have a hard
time having everything match up
correctly if these center lines aren't
where it's supposed to be so again we
want to make sure the center line is
centered a couple ways we can help
assure that just that while we're doing
the fitting we can place these right on
the center line and then put some spring
clamps in there so that now when we go
to drop these in place those ends up
there or right on the center line so
when we go to fit down at the pointy end
here everything's going to be aligned at
least on the center line up at that end
so with it centered down there get these
reference lines marked up aligned up
we're looking for where it's tight it's
tight right in here it's loose up but
they're loose there and the other thing
to remember I mentioned this before we
don't want to force this in I can move
this this side here you know good eighth
of an inch maybe even three sixteenths
or quarter-inch so I could make this
taper way off and still by just jamming
it in there you know that's a perfect
trick right there so I don't want to jam
it in there I want to make the fit so
when I put it in here I'm not forcing it
it just sort of drops right in so that's
our goal so get that taper so it's a
good fit for what's there and we don't
have to jam it in
force it so we'll look for where it's
tight and we'll start playing away where
it's tight first and then little
lengthen that those playing strokes out
as we playing away at it to make a nice
smooth curve and so just in a rough fit
that's looking a whole lot better on
this side just tight over here so when I
have it fitted tightly down against
these edges here it's opening up the top
edge ever so slightly when I push down
on it here you see it's spreading that
out right in here a little bit I'm sure
it shows up in the camera but this is
spreading out there just a little bit
that's what I think I'm going to do is
plane away at this end a little bit more
on both sides so it doesn't need to be
pushed down quite as much it's fitting
really nicely right there and when I
push down here it's not pushing the
sides out at all just bevel on this
sides a little bit open at the top it's
really not bad a little bit so I'm going
to adjust this bevel here ever so
slightly but just start with the tight
up against the existing face and then
open it up a little bit at the top
that's nice and tight and so just tight
at the top so that's looking pretty nice
right in there tapers here they're very
much the same length so that means the
next strip is going to be starting and
very much the same place on both sides I
want to be able to glue these pieces
accurately in place the fit seems about
right
such that these reference lines back
here are right there and right there so
I'm going to fit one strip at a time I
want to find the center line here so
this is going right down the center line
and this lined up right there just to
help us get things in the proper place
now in here I need a little bit of glue
on the taper and then I'm going to just
and some glue the next strip
yeah and some down on the taper section
now we can grab the next set of strips
the strip's will go in roughly like this
if I were trying to religiously a slip
match everything
these would end up being aligned with
the ends will slide everything down like
this and that way the grain pattern is
showing up here gets moved down to here
and so again that will reflect the taper
of this back deck and in and sort of
highlight that shape without me actually
doing anything fancy with the strips I
will get a v-shaped pattern going down
here I don't need to add any other
colors this is just using the natural
grain of the wood to highlight the
actual shape of the boat so now I'm just
looking from the tip here down to where
it crosses the feature line right in
there and mark out that taper you you've
got squirrely grain here you need to be
careful that you don't end up cutting
past this line with your jackknife this
green has a little wow right in here but
it tends to make it split off at a
shallower angle rather than a steeper
angle so it should be okay to come down
pretty close to the line with the
once again the strips going to be in
here at approximately this angle just
slightly tipped and it's going up
against this accent strip that's got a
bevel angle something like that so if I
hold these in that same angle relative
to each other as I'm doing the planing I
should end up with a good first estimate
on the fit I can always adjust it later
so I'm not yet down to the line I'm just
going to try to fit so it's tight down
here loose up here I'll work on down at
this end first looks like it's ever so
slightly open at the top so the tapers
tight down here and the bevel is a
little bit tight at the bottom loose at
the top so I'll try and adjust for that
as well so starting at the heel and
longer strokes to get out
slightly overcompensated here it gets
tight right in here and runs pretty well
up all the way to the end and so I'm
going to run along here and still a
little tight right there notice I can do
this fitting while the tapes there I
don't need to peel that tape off
immediately and while I'm doing this
fitting the glue between these two
strips is setting up so I can leave that
to do its thing while I'm working on
getting these fits correct
alright this taper looks good but it's a
little bit open at the top you see a
little gap all the way down the length
and it's a uniform gap the whole way so
that indicates that I need to adjust the
bevel a little bit so once again get it
tight with the plane
flat against the existing surface then
open it up at the top edge a little bit
to match the gap we just saw and now
playing down the length maintaining that
same angle and see if it's any better so
now that gap is pretty well disappeared
we do have a little bit of crown in the
shape here and since these are pretty
wide strips it does exaggerate any gap
that may end up in between these two
strips so before I go for a final fit I
just want a hand bevel I could
technically I could take the Robo bevel
and fit it in here and I do need to make
sure I just noticed here I've got a
little drip of glue there make sure
that's out of the way and that's not
messing with what I see there's a little
bit of a gap there some of that due to
just having the thickness of the tape
here but I see that gap where the tape
is - so a little bit of beveling
along this edge will eliminate that gap
so that's a much tiger seam along here
now so before I go ahead and glue that
one in I'm going to fit this side so
I'll line this in with the point make a
mark where this Cross is the future line
so just looking at what that bevel is on
this strip and something like that and
this this strips going in something like
that and so again just to approximate it
it's very much open at the top so I
didn't do a good job of estimating that
first bevel but I tend to prefer it be
open at the top first when it's tight at
the top it may be open at the bottom and
I don't know it it's just hard to see
inside there so by having it open at the
top you know I can adjust for what I see
here and hopefully get a good tight
joint between this and the act that
accent strip I think the taper looks
pretty good it may be a little tight
there a little tight there and a little
bit loose in the middle but basically
the taper looks pretty decent to start
with so I'm just going to work on fixing
that bevel so again get it tight between
the plane and the strip and then open it
up to match the gap we were just seeing
and then playing away that gap
so holding the plane at a constant devil
angle and see if that improved now
definitely improved it didn't make it go
away I've got a little bit more gap
remaining so same drill that's very much
better a little bit more room and it
looks a little tight down here alright
that's looking pretty nice I take a
little bit off the tip here when I'm
doing this fitting I don't want this top
edge here to overhang and stick proud
above the accent strip if this edge is
high on the accent strip that means the
whole strip is high on the accent strip
and so in order to fare it out I will
need to plane away more material in this
area in order to get this top surface to
hit the top edge of that accent strip
when this is all complete I'd like to
have a nice smooth surface here nice
smooth surface here and a fairly sharp
angle right where that accent strip is
to make its transition from the back
deck to the side of the boat so that
accent is intended to be the transition
from the side to the top so I wanted
work on making this fit down flush top
edge flush with that accent strip and
it's a little proud right here so I'm
going to just take a little bit out of
that central area okay now just coming
down rate flush with that top edge I
still have a gap on this side at the
same way I did on that side and so we'll
just do a very slight bevel on that edge
the greens a little squirrely here
rising up and falling in and so I'm
switching which direction I'm planing so
I minimize the tare out along that edge
so get a nice tight looking scene there
without little specks of chipped wood
which can happen so that's nice and
tight along that seam and so I'd say
we're ready to glue both sides in in
which case we'll take that tape off
again we don't need this excess length
so quick way too short
cut halfway through break it off the
actual cockpit is going to end up coming
through somewhere back here and I've got
some slots cut in the forms that's going
to indicate the edge of the cockpit so
I'm just making sure I'm going past
where I believe the edge of the cockpit
is going to end up with these strips I
don't need to go all the way into the
cockpit proper with it so same drill
mark the taper trim it off that's to
make the bevel and clean up the tape
before I get right down on the line
I'll check the bevel and the taper devil
looks good taper looks like it's coming
in pretty close it's looking pretty good
but I'm feeling my plane is dull so I'm
going to sharpen my plane
[Music]
[Music]
[Music]
so that finishes up the stripping on the
kayak it's not all the woodwork done
they still have the coaming recess to
put in but this is now the shape of the
boat so I am pleased with how it's
coming out I think this back decks gonna
look cool it's hard to see it with all
the tape on it now but there's a pattern
of repeating Wiggly grain that follows
down along the the feature line here
again you'll see a sort of echo of the
feature line in the grain as it proceeds
across the strips I'm just gonna let the
glue dry on this I I believe the next
step I plan to do will be working on
that calming recess I need to cut out
the parts and I haven't decided exactly
how I'm going to do that I may cut them
out of a cool may I may cut them out of
a panel of cedar strips so they glue
together we'll see like I said I haven't
figured it out yet I have to think about
it a little bit
I've just been focused on getting these
strips done until I figured out what I'm
gonna do next if you enjoy this video
please give me a thumbs up if you're
enjoying this whole series and you want
to be posted on one of the next ones
coming please hit subscribe my patreon
subscribers get access to these videos
about a week or so before the general
public does and I appreciate your
support if you're supporting me on
patreon it really helps out until the
next video thanks for watching and happy
paddling