Sorting strips for book matching from a 3/4" x 12" flat grained board
so the stars aligned today and I'm able
to get out for morning paddle I'm hoping
today to get back into the shop and
start sorting out the strip's I've
ripped them all in order and kept them
in that order that they came off the
board now I want to figure out how I'm
gonna lay those strips down on the boat
I'd like to match them a book match them
which means have the mirror to round the
center line so it's a matter of finding
a pattern is going to look the best
so so doing these strips out can be sort
of a brain bending exercise to make it
easier I'm gonna start with the material
for the bottom of the boat if you
remember I found a flat brain light
color piece of western red cedar and I
just ripped strips off the edge so I'm
gonna try and lay them out in a mirrored
pattern with half the strips on one side
of the keel line the other half on the
other side of the keel line let's begin
by just looking at how I have my outfeed
table set up here these are the same
tables I used for the out feet of the
table saw and it's important to have
enough support so the strips don't sag
down at the end we're going to be
flipping them down flat and this thin
stuff just droops away with gravity so I
have enough support here that it'll stay
level and they'll be easier to deal with
with the material unbound we can now lay
the strips out in order so I'm flipping
each one down the same direction
it helps to have a flat surface down
here at the end to just but the strips
up against that way we can get them all
positioned at the same length and see
what the pattern looks like I like to
get some reference lines on these as
soon as I can
and as you see when I cut these right
after I cut them I ended up with some
reference lines and now with it but it
against the ends I double checking and
see that this one's a little bit messed
up and this should be up that way
so this mark is wrong if double checked
the end I've double check check the
grain matching and so now I'm just going
to redraw these lines making whole
darker alright so now that that's get
that settled in I also want to get some
numbers on the strips so starting at one
side 1 2 3 4 42 43 so I got 43 strips
out of this 12 11 and a half inch wide
board and that's pretty good so I want
to put these numbers on several
locations these numbers are going to
help me as I'm laying the strip's down
on the boat there'll be a sanity check
to make sure everything's in order as
I'm working on the boat the strips are
gonna be changing in length there as I
get towards the centerline of the boat
those strips are going to get shorter
and shorter I'd like to have the numbers
visible at all points in the
construction process so I can have that
sanity
multiple times so I'm going to end up
putting these numbers multiple places on
the strips
I'll have them at up at the ends down in
the middle and on both sides starting
with the same strip one two three and I
came out with the same numbers again
excellent these reference lines will be
used to help me align the grain when I
go to put this strips on the boat they
tell me what the order of the strips are
and they also tell me how one strip
alliance to the other so I can from the
middle of the strip I can figure out
where the alignment occurs and then make
these clear relative to those earlier
marks that were a little bit off I'm
gonna make a double line
and we will number it again I'm going to
slide the whole bundle forward so I can
get numbers on the ends just get it so I
can reach them number again so now I've
got them numbered this side but some of
the strips are going to be installed
with the other side up I it's not
necessarily these trips going to be
installed with this side up so I want to
get the other side numbered as well so
just take each strip one by one flip it
now we number the strips again but this
time I'm going to circle the number by
circling the number I'm indicating this
is what we'll call the back side of the
strip just to differentiate it from the
previous side so when they're oriented
like this they're all oriented in the
same direction
now I want to find where the reference
lines are on the other side of the
strips so the right here and the right
there and so I want to get reference
lines in approximately the same place so
when I am mirroring the pattern on one
side and the other
I have equivalent reference lines on
both sides of the strips so again I'm
just going to draw some lines across
here
I'll make this set of lines distinctive
from the ones on the other side by
having a few more lines or different
number of lines from what's on the other
side just so we have something to go by
and then the numbers are right in this
area so we'll do that again on with a
circle two of the circle three with the
circle etc
all this numbering seems like a painter
but it is but again it's just we're
doing this process here that's very anal
and this just makes it easier to be anal
I'm just creating a bunch of sanity
checks so when I'm working on this I
don't have to do a lot of thinking once
I've got all these strips figured out
I'm just gonna be taking one strip at a
time and this will just be a way to
double-check that I got everything right
you saw when I was cutting the strips
before that I had a sanity check on my
board and I still made a mistake so this
isn't gonna stop me from making mistakes
but it gives me just a little bit more
opportunity to catch myself before I
screw up what I have to watch out for
doing this is I get ahead of myself
counting in my head and I start miss
numbering I have innumerable ways of
screwing up
so a useful piece of information right
now for planning out the stripping
pattern is figuring out how many strips
you actually need so instead of counting
I have everything lined up out there and
it denotes a certain width of strips
that I can cover so if I take I'm gonna
cover the bottom of the boat with those
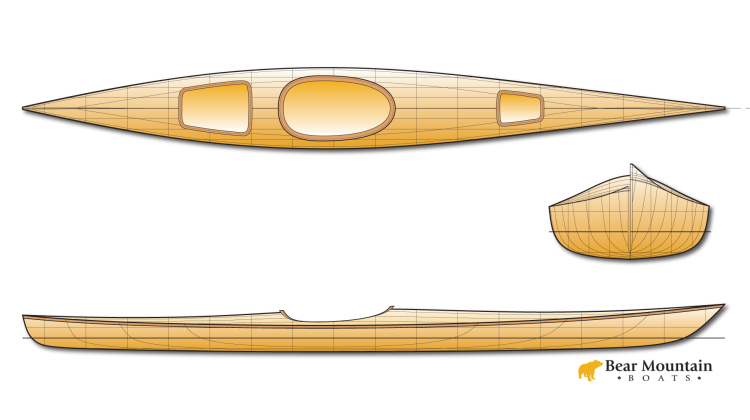
strips so so I take the forms and just
flip them over
I find the widest place and I'm going to
strip from water line to water line
that's where I want the bottom of my
boat to be so that's where I want the
light color to be is from the design
water line to the design water line so
from here up to the center and the
mirror image from here up to the center
so the widest part of the boat is
typically rated in the mid ships of the
kayak so it's either this form here or
this form here and so I'm just going to
measure from the water line here to the
water line over here that's 24 inches so
let's just see what it is here all right
24 and 1/2 inches go back one more see
what it is there
that's 24 and 1/2 inches back another 23
and 1/2 so 24 and 1/2 sounds like this
about right so if I look at this set of
strips here
how much width do I have here I've got
29 inches so I only need 24 so it's a
matter now of figuring out which 24
inches do I want if you look back in the
episode where I was examining this
lumber on the raw board you may remember
that in the middle of the board was much
more flat grain that and then at the end
of the board
they're edge of the board in that case
that what that indicates is this is
going to be more vertical grain in the
middle and more flat grain at the end in
these strips and just looking at these
strips these out here very flat grain
and we've got a little bit of the
lighter colored strips there that
probably indicate that was your new
growth would here everything seems to be
tighter so we'd sort of like to favor
probably this this side of the panel if
we look at twenty four and a half inches
here we could get out to this point and
essentially eliminate those strips right
there
but we also have something going on at
the end of the strip as I was cutting
this board I noticed that there was some
splits in it you can see in here
this board is splitting away there and
as a result I lost this whole section
out of the board and that ended up with
these shorter strips here so if these
strips were at the waterline they need
to be full-length going all the way from
the bow of the boat to the stern of the
boat but as you get up towards the Kea
line the strip's get shorter and shorter
they mesh together like this and so I
don't need full-length strips up near
the centerline of the boat so if I'm
going to use these strips on the boat I
want to make sure that they are toward
end up towards the keel line of the boat
so here we have the first few strips in
the stack and these are slip matched in
that if they were cut like this they're
all slipped one after the other what we
want is to get these to book match I'm
so looking back at the reference lines
if I flip these up that's some reference
lines on here I made before cutting the
strips and you
see these are not lining up correctly so
this one looks like it should be over
here we want to keep the order correct
so we're going to flip it down and flip
it up this way and see what we get all
right and that's a funny-looking mark
but we keep flipping up I line the ends
here you start to see those reference
lines are lining up correctly they make
sense connecting one to the next so you
lay these back down just look at the
first two laying them down so the
circled side is up
these are Radice - originally were
together like that slip matching is when
we take them and put them down like that
book matching is when we take them and
open them up like a book so there you
see the grain matches one side to the
next
it doesn't match perfectly because we
have the thickness of the saw kerf going
in there but you see it's a it's
basically a mirror image and so slip
matched is when we go down like this
book match is when we go down like this
so for every strip there's a couple book
matched pairs number two book matches
with number one like that
and number three book matches with
number two like that
and number three book matches with
number four like that so as we go across
the whole board we end up with a bunch
of potential book matches across the
board so we can with the combination of
book matching and slip matching we can
get a mirror image with the repeating
grain pattern going all the way across
the bottom of the boat and again these
strips are just cut out off the edge of
the plank and lay down in that same
order so what we want to do is figure
out looking at this the way if book
matches is when the odd is up the odd
without the circle is up and the even
with the circle is up and so if I take
here I've got one and two match together
if I flip over number three I've got one
in four match together and likewise I
can take number five flip it over and
get a matched pair with five and six so
that's what I'm looking to do get that
all the way across the board so if I
start at this edge of the board with
strip number one and flip that one over
I've got one and two book-matched
relative to each other now if I take
number three flip it over and bring it
out to the outside one and two our book
match and three and four our book
matched now I'll take number five so I'm
taking each odd one flipping it over and
moving it to the outside so five and six
are now matched take seven nine so you
see as I move these across the strips if
if they were sagging at the ends I'd
have a hard time moving these strips one
across the other but since they have
them supported several places down the
length all at the same level they're
easy to move across here so there we
have another one of those ones that was
a little bit checked and keep that piece
again just grabbing the odd ones and
moving them across and flipping them
over
let's just stack together so there we
have a match set and I can just do a
sanity check that everything's matching
here look at my reference lines and
notice that these don't connect but
that's there's a strip missing in the
middle here we have something that's a
little bit off it doesn't look quite
right if I look up to this point I see
that this one has a circle around it and
all the others do not so I want to take
and flip that one over so they're all
oriented the same side up so we here we
have a mirrored set of strips strip one
match of strip - strip three matches
strip four five and six seven eight nine
ten and so and that pattern repeats all
the way down and so each strip next to
each other the tricks grain changes
gradually so we have slip matching one
strip to the next obviously there's a
certain amount of wood missing because
the strip on the far side the matching
strip on the far side is missing between
between strip 12 and 14 strip 13 is
missing so the continuity between these
is a little bit farther apart than if it
was purely consecutive strips but it's
still the the grain changes gradually
across the face of this set of strips so
I only need twenty four and a half
inches of width here and right now if I
lay the center line here at 12 and a
quarter to get 24 and a half we go out
to strip 36 here and out to strip 35
there but frankly I don't like the wood
here in these first few strips quite as
much as I like the wood as it gets out
here a little bit more these strips out
here are fairly flat grain they start to
transition to more vertical grain out as
we get to strip 8 & 9
maybe strip 11 so if we go out here 12
and quarter from here we could take
these six strips out of the middle and
have a matching pattern starting with
strip 8 and 7 I'd like to be able to go
out a little bit farther but the it's
not bad it'll look nice I do that I'm
going to take the middle three strips
out of each set and just put them aside
so strip one three and five we'll take
it over to that side and strip two four
and six we'll take out put over on this
side we now have our match set like this
I'm going to take and remark all of
these with new reference lines that
indicate a new set of alignment so I
have it all pressed down towards the far
end so they're all even in length and I
will draw reference lines here and I'm
going to just give myself an indication
of where the center is I have a nice
cross there so here's the center line or
the mirror line and we'll make similar
marks down various places along the boat
one thing they may not be obvious
this face of the strip's we're looking
at right now is going to be the outside
of the boat because this is a side that
book match out so looking at we're more
interested in the appearance to the
outside of the boat so we're trying to
get maximize or matching across the
center line but it's also not clear is
this these strips here are at the
waterline and this out here at this edge
is the centerline it's a little
confusing but that's the case and I'm
going to be stripping from the
centerline up to the Kia line so I'm
gonna these are the first strips that
are going to go down so they'll go down
eight ten twelve fourteen and on the
other side seven nine eleven thirteen
starting that order so I want to set
these up and Amanda that I can easily
deal with them I've made these little
racks these just all the strip so I can
drop a strip right in there and these
strips here on the outside are going to
be at the centerline and they're going
to be the last strips to go onto the
boat so I want them to be the first
strips in the bins I want the top strip
in the bin to be the first strip that
goes on so I'm just going to take these
one at a time stick them up in these
bins off the panel laid out panel and
sticking them in a bin get all the
strip's until I have one whole side of
the bottom in a bin
just get them neatly in here so there's
all the strips for one side of the
bottom of the boat in order where the
the order they're going to be put down
on to the boat and just now to make sure
they don't get messed up while removing
stuff around I'll get some stretch wrap
on them now we will repeat with the
other side so the first strip in is the
last strip that's going to be put on the
boat so I'm keeping them in the same
orientation same face up as I had them
laid out and now we'll stretch wrap this
set as well
now we have the bottom strips sorted and
ready to go and so now we'll do our
sanity check all right a couple things
we notice here I've got three more
strips in this stack than I have in that
stack I look here I've got strip 8 and
10 there so says to me that this stack
should all be the even numbers I've got
an even number over here I've got 7
there 9 we want 8 over here 7 9 should
match up with that 7 isn't matching up
with 8 we need to get that in the stack
that'll match together
so then just as another reference to
make sure I keep track of everything if
I should move this bin and not remember
which side is going to be the water line
I'll say water line here or I could say
this side up just this will help me put
this back in the bin in the right order
so I can get everything where they need
to be when it comes time to put things
on the boat even if I'm moving stuff
around that wraps up sorting out the
wood for the bottom this was the easy
bear since the strips were simply ripped
off the edge of a board there were only
so many options for how to lay out the
strip's in the next episode I'll be
sorting out the layout for the strip's
cut from the 2 by 12 this presents more
options and complications they'll spend
some time reviewing the options and
layout the patterns from the micro
bloggers support if you want to see more
please subscribe please let me know if
you have any questions I'll try to
answer them as soon as I can
thanks again to my patreon supporters
your contribution is greatly appreciated
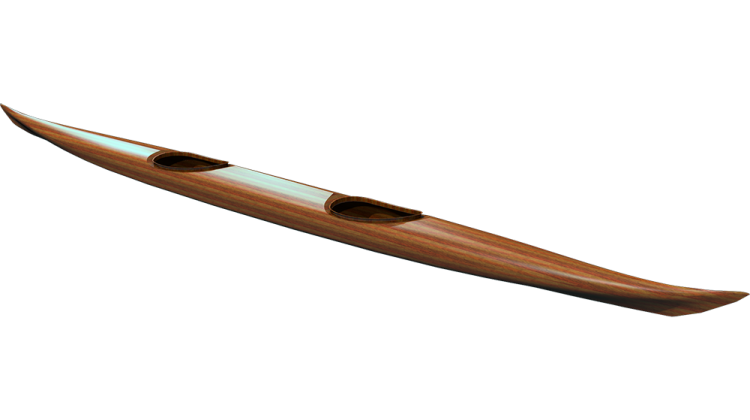
remember that you can find plans like
the micro bootlegger sport and other
small kayak designs on my website as
well as books on strip building until
the next episode thanks for watching and
happy paddling
to get out for morning paddle I'm hoping
today to get back into the shop and
start sorting out the strip's I've
ripped them all in order and kept them
in that order that they came off the
board now I want to figure out how I'm
gonna lay those strips down on the boat
I'd like to match them a book match them
which means have the mirror to round the
center line so it's a matter of finding
a pattern is going to look the best
so so doing these strips out can be sort
of a brain bending exercise to make it
easier I'm gonna start with the material
for the bottom of the boat if you
remember I found a flat brain light
color piece of western red cedar and I
just ripped strips off the edge so I'm
gonna try and lay them out in a mirrored
pattern with half the strips on one side
of the keel line the other half on the
other side of the keel line let's begin
by just looking at how I have my outfeed
table set up here these are the same
tables I used for the out feet of the
table saw and it's important to have
enough support so the strips don't sag
down at the end we're going to be
flipping them down flat and this thin
stuff just droops away with gravity so I
have enough support here that it'll stay
level and they'll be easier to deal with
with the material unbound we can now lay
the strips out in order so I'm flipping
each one down the same direction
it helps to have a flat surface down
here at the end to just but the strips
up against that way we can get them all
positioned at the same length and see
what the pattern looks like I like to
get some reference lines on these as
soon as I can
and as you see when I cut these right
after I cut them I ended up with some
reference lines and now with it but it
against the ends I double checking and
see that this one's a little bit messed
up and this should be up that way
so this mark is wrong if double checked
the end I've double check check the
grain matching and so now I'm just going
to redraw these lines making whole
darker alright so now that that's get
that settled in I also want to get some
numbers on the strips so starting at one
side 1 2 3 4 42 43 so I got 43 strips
out of this 12 11 and a half inch wide
board and that's pretty good so I want
to put these numbers on several
locations these numbers are going to
help me as I'm laying the strip's down
on the boat there'll be a sanity check
to make sure everything's in order as
I'm working on the boat the strips are
gonna be changing in length there as I
get towards the centerline of the boat
those strips are going to get shorter
and shorter I'd like to have the numbers
visible at all points in the
construction process so I can have that
sanity
multiple times so I'm going to end up
putting these numbers multiple places on
the strips
I'll have them at up at the ends down in
the middle and on both sides starting
with the same strip one two three and I
came out with the same numbers again
excellent these reference lines will be
used to help me align the grain when I
go to put this strips on the boat they
tell me what the order of the strips are
and they also tell me how one strip
alliance to the other so I can from the
middle of the strip I can figure out
where the alignment occurs and then make
these clear relative to those earlier
marks that were a little bit off I'm
gonna make a double line
and we will number it again I'm going to
slide the whole bundle forward so I can
get numbers on the ends just get it so I
can reach them number again so now I've
got them numbered this side but some of
the strips are going to be installed
with the other side up I it's not
necessarily these trips going to be
installed with this side up so I want to
get the other side numbered as well so
just take each strip one by one flip it
now we number the strips again but this
time I'm going to circle the number by
circling the number I'm indicating this
is what we'll call the back side of the
strip just to differentiate it from the
previous side so when they're oriented
like this they're all oriented in the
same direction
now I want to find where the reference
lines are on the other side of the
strips so the right here and the right
there and so I want to get reference
lines in approximately the same place so
when I am mirroring the pattern on one
side and the other
I have equivalent reference lines on
both sides of the strips so again I'm
just going to draw some lines across
here
I'll make this set of lines distinctive
from the ones on the other side by
having a few more lines or different
number of lines from what's on the other
side just so we have something to go by
and then the numbers are right in this
area so we'll do that again on with a
circle two of the circle three with the
circle etc
all this numbering seems like a painter
but it is but again it's just we're
doing this process here that's very anal
and this just makes it easier to be anal
I'm just creating a bunch of sanity
checks so when I'm working on this I
don't have to do a lot of thinking once
I've got all these strips figured out
I'm just gonna be taking one strip at a
time and this will just be a way to
double-check that I got everything right
you saw when I was cutting the strips
before that I had a sanity check on my
board and I still made a mistake so this
isn't gonna stop me from making mistakes
but it gives me just a little bit more
opportunity to catch myself before I
screw up what I have to watch out for
doing this is I get ahead of myself
counting in my head and I start miss
numbering I have innumerable ways of
screwing up
so a useful piece of information right
now for planning out the stripping
pattern is figuring out how many strips
you actually need so instead of counting
I have everything lined up out there and
it denotes a certain width of strips
that I can cover so if I take I'm gonna
cover the bottom of the boat with those
strips so so I take the forms and just
flip them over
I find the widest place and I'm going to
strip from water line to water line
that's where I want the bottom of my
boat to be so that's where I want the
light color to be is from the design
water line to the design water line so
from here up to the center and the
mirror image from here up to the center
so the widest part of the boat is
typically rated in the mid ships of the
kayak so it's either this form here or
this form here and so I'm just going to
measure from the water line here to the
water line over here that's 24 inches so
let's just see what it is here all right
24 and 1/2 inches go back one more see
what it is there
that's 24 and 1/2 inches back another 23
and 1/2 so 24 and 1/2 sounds like this
about right so if I look at this set of
strips here
how much width do I have here I've got
29 inches so I only need 24 so it's a
matter now of figuring out which 24
inches do I want if you look back in the
episode where I was examining this
lumber on the raw board you may remember
that in the middle of the board was much
more flat grain that and then at the end
of the board
they're edge of the board in that case
that what that indicates is this is
going to be more vertical grain in the
middle and more flat grain at the end in
these strips and just looking at these
strips these out here very flat grain
and we've got a little bit of the
lighter colored strips there that
probably indicate that was your new
growth would here everything seems to be
tighter so we'd sort of like to favor
probably this this side of the panel if
we look at twenty four and a half inches
here we could get out to this point and
essentially eliminate those strips right
there
but we also have something going on at
the end of the strip as I was cutting
this board I noticed that there was some
splits in it you can see in here
this board is splitting away there and
as a result I lost this whole section
out of the board and that ended up with
these shorter strips here so if these
strips were at the waterline they need
to be full-length going all the way from
the bow of the boat to the stern of the
boat but as you get up towards the Kea
line the strip's get shorter and shorter
they mesh together like this and so I
don't need full-length strips up near
the centerline of the boat so if I'm
going to use these strips on the boat I
want to make sure that they are toward
end up towards the keel line of the boat
so here we have the first few strips in
the stack and these are slip matched in
that if they were cut like this they're
all slipped one after the other what we
want is to get these to book match I'm
so looking back at the reference lines
if I flip these up that's some reference
lines on here I made before cutting the
strips and you
see these are not lining up correctly so
this one looks like it should be over
here we want to keep the order correct
so we're going to flip it down and flip
it up this way and see what we get all
right and that's a funny-looking mark
but we keep flipping up I line the ends
here you start to see those reference
lines are lining up correctly they make
sense connecting one to the next so you
lay these back down just look at the
first two laying them down so the
circled side is up
these are Radice - originally were
together like that slip matching is when
we take them and put them down like that
book matching is when we take them and
open them up like a book so there you
see the grain matches one side to the
next
it doesn't match perfectly because we
have the thickness of the saw kerf going
in there but you see it's a it's
basically a mirror image and so slip
matched is when we go down like this
book match is when we go down like this
so for every strip there's a couple book
matched pairs number two book matches
with number one like that
and number three book matches with
number two like that
and number three book matches with
number four like that so as we go across
the whole board we end up with a bunch
of potential book matches across the
board so we can with the combination of
book matching and slip matching we can
get a mirror image with the repeating
grain pattern going all the way across
the bottom of the boat and again these
strips are just cut out off the edge of
the plank and lay down in that same
order so what we want to do is figure
out looking at this the way if book
matches is when the odd is up the odd
without the circle is up and the even
with the circle is up and so if I take
here I've got one and two match together
if I flip over number three I've got one
in four match together and likewise I
can take number five flip it over and
get a matched pair with five and six so
that's what I'm looking to do get that
all the way across the board so if I
start at this edge of the board with
strip number one and flip that one over
I've got one and two book-matched
relative to each other now if I take
number three flip it over and bring it
out to the outside one and two our book
match and three and four our book
matched now I'll take number five so I'm
taking each odd one flipping it over and
moving it to the outside so five and six
are now matched take seven nine so you
see as I move these across the strips if
if they were sagging at the ends I'd
have a hard time moving these strips one
across the other but since they have
them supported several places down the
length all at the same level they're
easy to move across here so there we
have another one of those ones that was
a little bit checked and keep that piece
again just grabbing the odd ones and
moving them across and flipping them
over
let's just stack together so there we
have a match set and I can just do a
sanity check that everything's matching
here look at my reference lines and
notice that these don't connect but
that's there's a strip missing in the
middle here we have something that's a
little bit off it doesn't look quite
right if I look up to this point I see
that this one has a circle around it and
all the others do not so I want to take
and flip that one over so they're all
oriented the same side up so we here we
have a mirrored set of strips strip one
match of strip - strip three matches
strip four five and six seven eight nine
ten and so and that pattern repeats all
the way down and so each strip next to
each other the tricks grain changes
gradually so we have slip matching one
strip to the next obviously there's a
certain amount of wood missing because
the strip on the far side the matching
strip on the far side is missing between
between strip 12 and 14 strip 13 is
missing so the continuity between these
is a little bit farther apart than if it
was purely consecutive strips but it's
still the the grain changes gradually
across the face of this set of strips so
I only need twenty four and a half
inches of width here and right now if I
lay the center line here at 12 and a
quarter to get 24 and a half we go out
to strip 36 here and out to strip 35
there but frankly I don't like the wood
here in these first few strips quite as
much as I like the wood as it gets out
here a little bit more these strips out
here are fairly flat grain they start to
transition to more vertical grain out as
we get to strip 8 & 9
maybe strip 11 so if we go out here 12
and quarter from here we could take
these six strips out of the middle and
have a matching pattern starting with
strip 8 and 7 I'd like to be able to go
out a little bit farther but the it's
not bad it'll look nice I do that I'm
going to take the middle three strips
out of each set and just put them aside
so strip one three and five we'll take
it over to that side and strip two four
and six we'll take out put over on this
side we now have our match set like this
I'm going to take and remark all of
these with new reference lines that
indicate a new set of alignment so I
have it all pressed down towards the far
end so they're all even in length and I
will draw reference lines here and I'm
going to just give myself an indication
of where the center is I have a nice
cross there so here's the center line or
the mirror line and we'll make similar
marks down various places along the boat
one thing they may not be obvious
this face of the strip's we're looking
at right now is going to be the outside
of the boat because this is a side that
book match out so looking at we're more
interested in the appearance to the
outside of the boat so we're trying to
get maximize or matching across the
center line but it's also not clear is
this these strips here are at the
waterline and this out here at this edge
is the centerline it's a little
confusing but that's the case and I'm
going to be stripping from the
centerline up to the Kia line so I'm
gonna these are the first strips that
are going to go down so they'll go down
eight ten twelve fourteen and on the
other side seven nine eleven thirteen
starting that order so I want to set
these up and Amanda that I can easily
deal with them I've made these little
racks these just all the strip so I can
drop a strip right in there and these
strips here on the outside are going to
be at the centerline and they're going
to be the last strips to go onto the
boat so I want them to be the first
strips in the bins I want the top strip
in the bin to be the first strip that
goes on so I'm just going to take these
one at a time stick them up in these
bins off the panel laid out panel and
sticking them in a bin get all the
strip's until I have one whole side of
the bottom in a bin
just get them neatly in here so there's
all the strips for one side of the
bottom of the boat in order where the
the order they're going to be put down
on to the boat and just now to make sure
they don't get messed up while removing
stuff around I'll get some stretch wrap
on them now we will repeat with the
other side so the first strip in is the
last strip that's going to be put on the
boat so I'm keeping them in the same
orientation same face up as I had them
laid out and now we'll stretch wrap this
set as well
now we have the bottom strips sorted and
ready to go and so now we'll do our
sanity check all right a couple things
we notice here I've got three more
strips in this stack than I have in that
stack I look here I've got strip 8 and
10 there so says to me that this stack
should all be the even numbers I've got
an even number over here I've got 7
there 9 we want 8 over here 7 9 should
match up with that 7 isn't matching up
with 8 we need to get that in the stack
that'll match together
so then just as another reference to
make sure I keep track of everything if
I should move this bin and not remember
which side is going to be the water line
I'll say water line here or I could say
this side up just this will help me put
this back in the bin in the right order
so I can get everything where they need
to be when it comes time to put things
on the boat even if I'm moving stuff
around that wraps up sorting out the
wood for the bottom this was the easy
bear since the strips were simply ripped
off the edge of a board there were only
so many options for how to lay out the
strip's in the next episode I'll be
sorting out the layout for the strip's
cut from the 2 by 12 this presents more
options and complications they'll spend
some time reviewing the options and
layout the patterns from the micro
bloggers support if you want to see more
please subscribe please let me know if
you have any questions I'll try to
answer them as soon as I can
thanks again to my patreon supporters
your contribution is greatly appreciated
remember that you can find plans like
the micro bootlegger sport and other
small kayak designs on my website as
well as books on strip building until
the next episode thanks for watching and
happy paddling