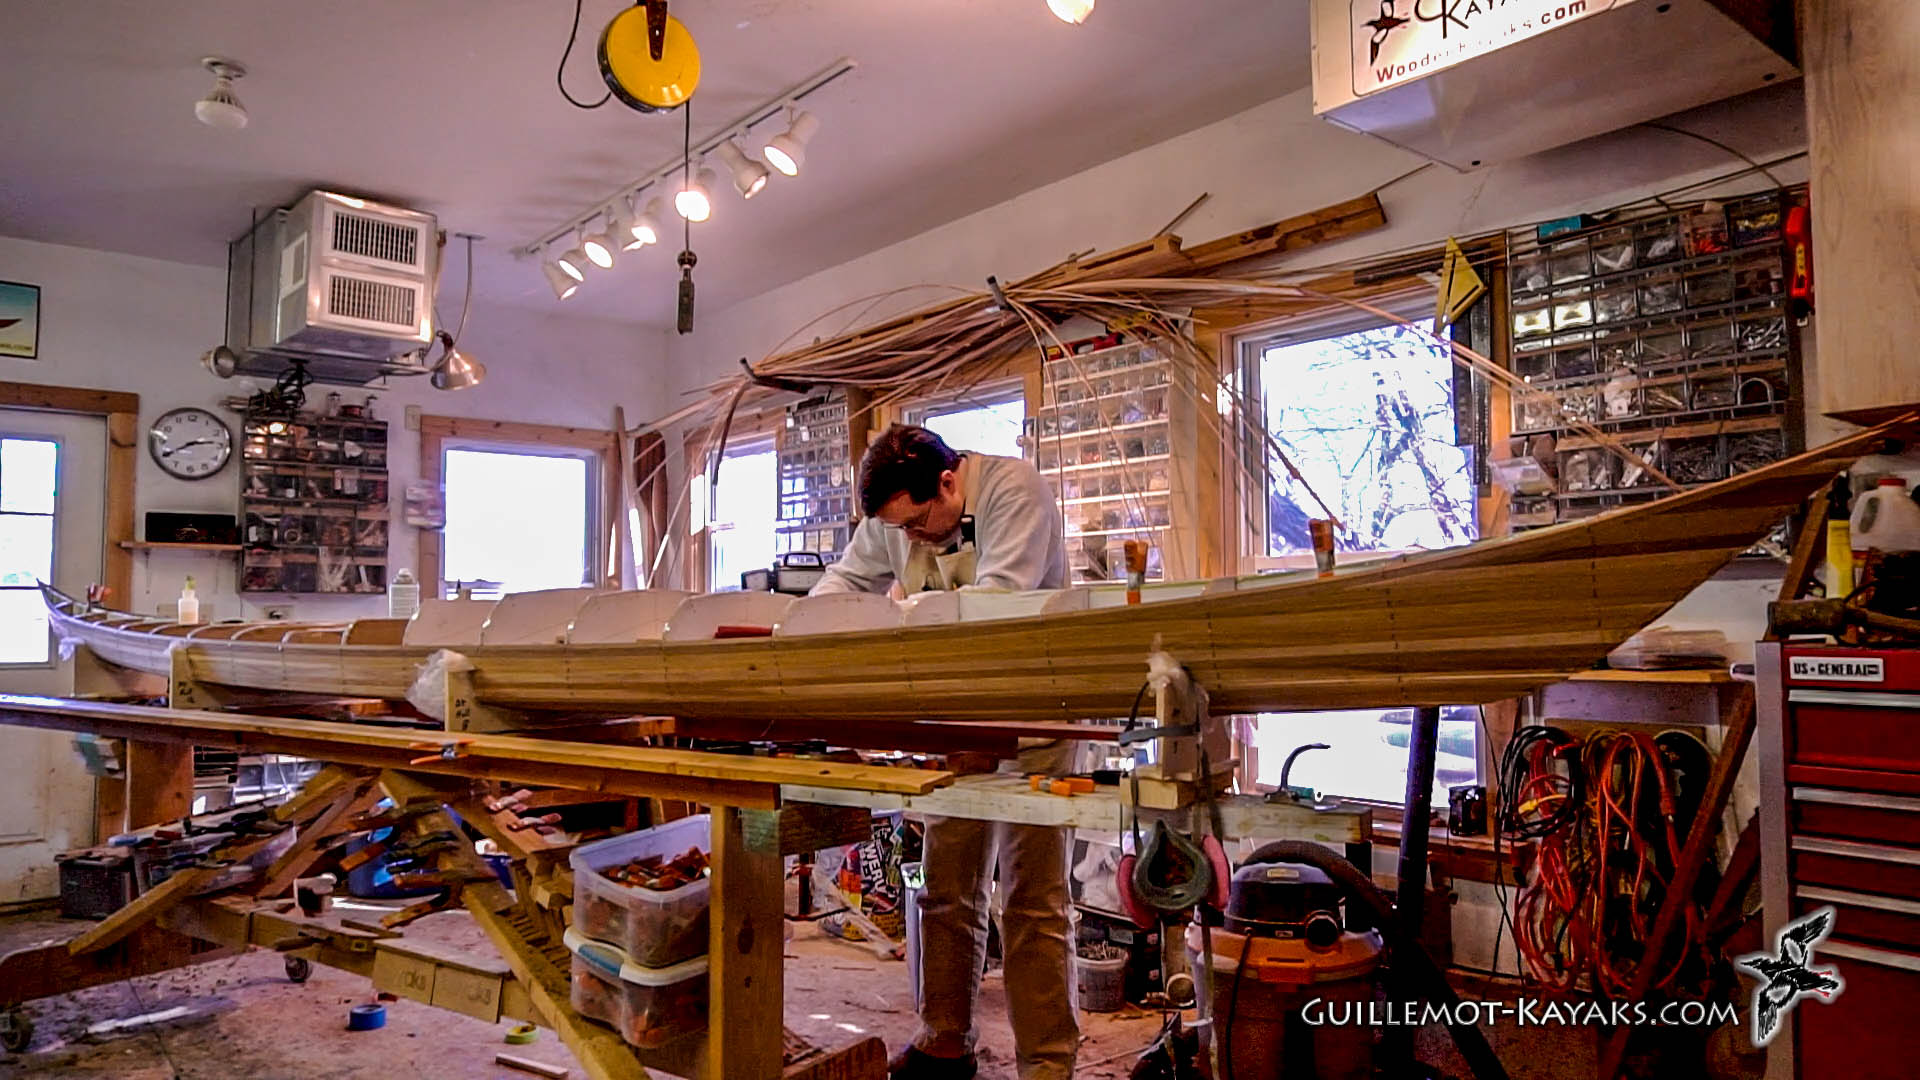

In Episode Five of Building the Petrel Strip Built Sea Kayak, the focus is on stripping the deck. Despite an issue with sound recording, Nick pushes forward, detailing the process of cutting and shaping the shear strips to form a tight joint on the deck. The use of an alternating herringbone pattern and the creation of opposing coves to fit into the deck are highlighted. Nick walks through the process of fitting the strips along the deck, ensuring a good and tight joint. A miter box is used to create consistent joints at the joints of the strips, adding to the overall quality of the build.
This is the Strip Built Petrel design.
Support my Patreon at: https://www.patreon.com/NickSchade
Tools:
- Mini Shoulder Plane: https://www.leevalley.com/en-us/shop/tools/hand-tools/miniature-tools/p…
- RoboBevel: https://www.guillemot-kayaks.com/catalog/boat-building-tools/robo-bevel…
- Low Angle Block Plane: https://www.lie-nielsen.com/products/small-block-planes?path=handplanes…
- Apron Plane: https://www.leevalley.com/en-us/shop/tools/hand-tools/planes/block/4679…
- Craftsman Cutting Sheers: https://amzn.to/36Cr5PW
- Heavy Duty Hot Melt Glue Gun: https://amzn.to/2U3c9YJ
- 1" Spring Clamps: https://amzn.to/3aP8fZy
- Green high-stick Tape: https://amzn.to/317aLFV
- Titebond Glue: https://amzn.to/3aOhSaP
- 4-oz Boston Round Squeeze Glue Bottles: https://amzn.to/2RAYK8B
Hey, welcome to Episode Five of Building the Petrel Strip Built Sea Kayak. In this episode, we will be working on stripping the deck.
I apologize for the sound in advance. I had a problem with my microphone. It was recorded over a year ago, so not much can be done about it now. But let's get right to it.
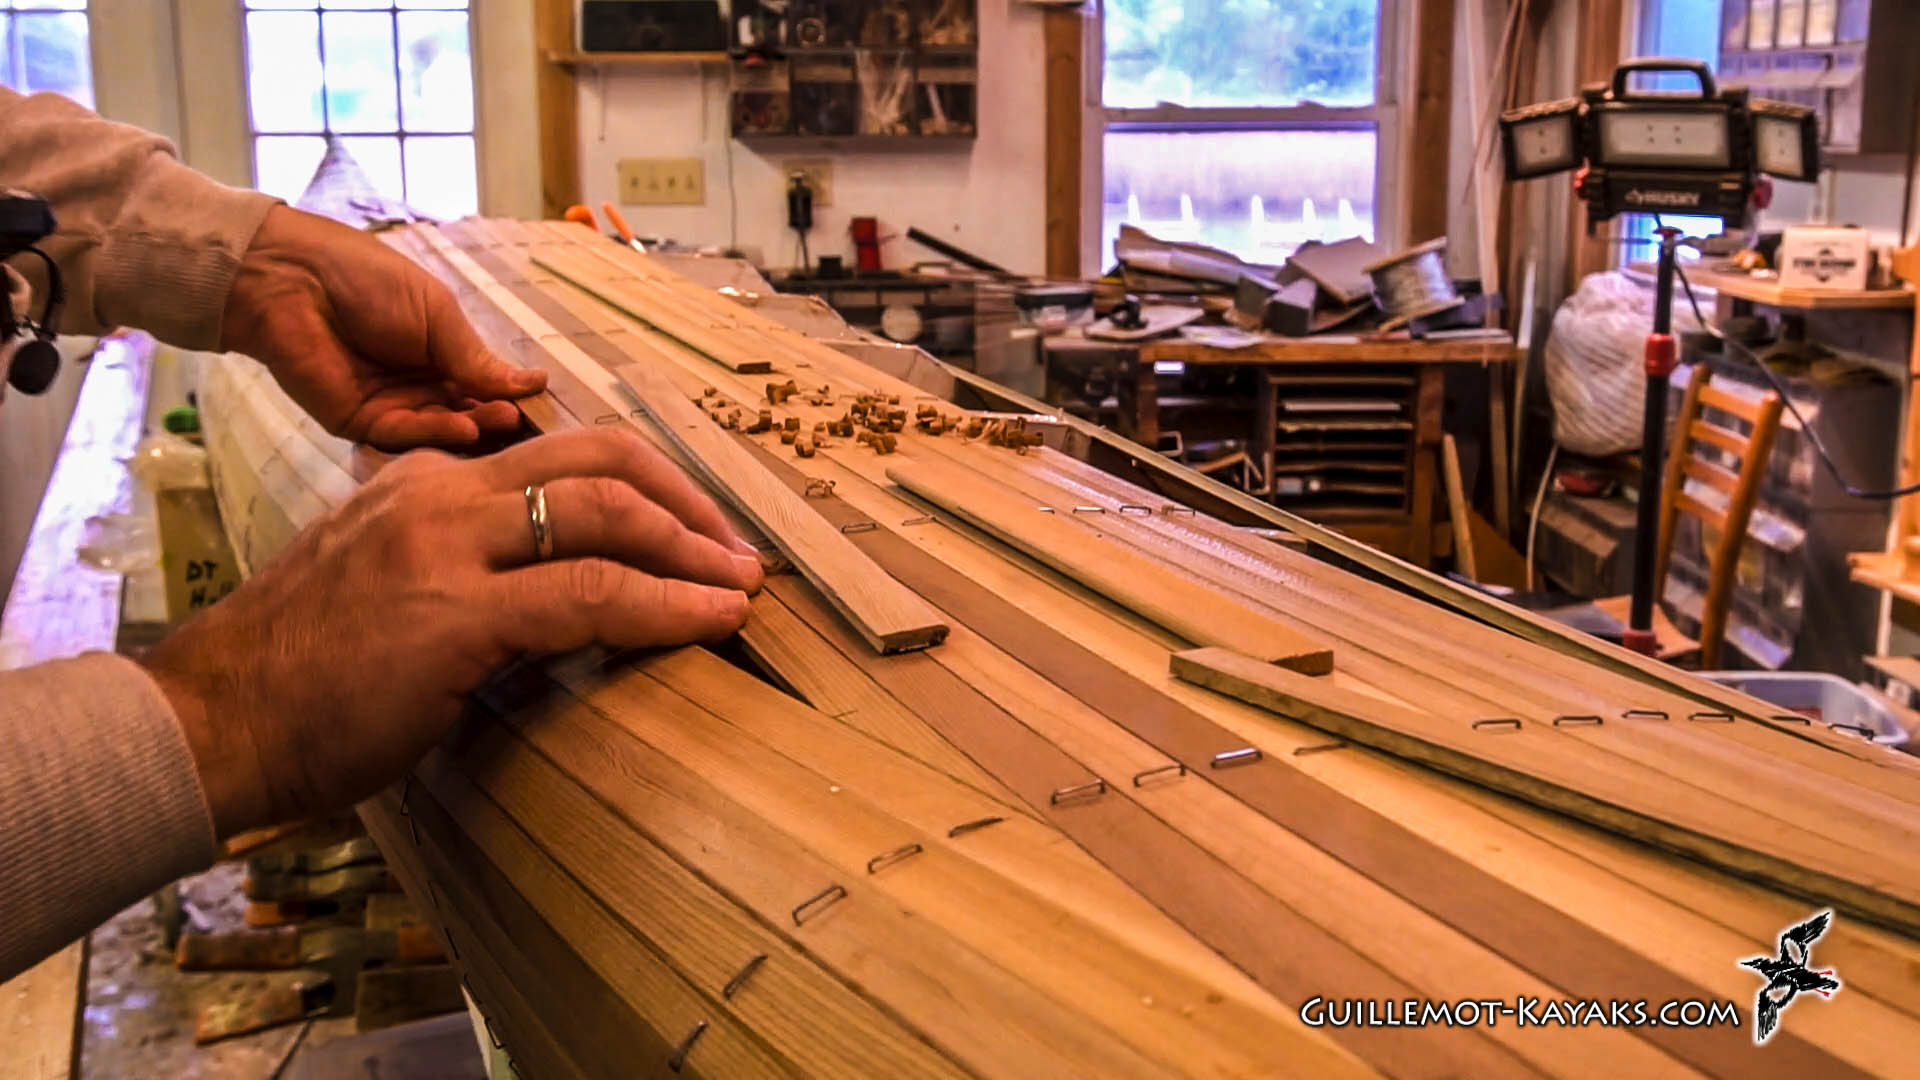
I've cut down another shear strip for the deck. I scarfed it together to have a long piece out of the dark wood, and then I've tapered the ends. So basically, I'm ready at this point to start beveling this edge so I get a nice tight joint on the outside. There—again, we're trying to get essentially a miter between the hull and the deck. It doesn't need to be perfect; we'll have a chance to clean it up later, but we just want to get it close.
So, we've done a number of the forms just to make it easy to drop things back into place, so by the time we get to seven, basically no beveling is required. So from here, we'll take a block plane and just eyeball the gap, and try to match the gap so the two strips join.
The batten's turn just like this, and so I want to make a miter between those two. Before I do that, since I'm going to put some glue in there, I just want to put a little bit of masking tape over the inner stem, so things don't get glued down. So this is going to come straight out and meet in the sharp point, something like that. And then to get a good tight fit on, I'll just run a saw through it again. That's a good tight fit; then I can put a little glue in there, hold that together with a little tape.
I'm also gonna clip off that sharp point because that's just gonna break off eventually anyway. So I'm gonna do an alternating herringbone on the deck. And that means the second set of strips run down the center line, and then the third set will run along the shear line. Center line, shear line, center line, shear line, center, shear line, etc. And we have a cockpit in the middle, so we only need to go as far as the cockpit. You'll see the first flat form is where the cockpit is, so I want to make sure I'm into the cockpit, so I'm gonna cut it off even with that form.
So, since I'm gonna be doing this alternating thing, I always want the cove out, so I'm always fitting a strip into a cove. So I took a couple strips and I ripped the bead off, and now I have two opposing coves, and this will fit right into the end and run down the center line as far as the cockpit.
I could take one strip and put coves on both sides and just run that up the middle, and that would work great. However, I do like to get a little bit of a natural V up near the bow. I think it looks good, so back here, it's going to be rounded and a smooth transition from left to right side up, and here I do want a little bit of an angle there, so there's a little feature line a ridge right down the middle, so by having two pieces, I can naturally get that.
And I'll end up doing a little bit of beveling on these strips to get them so they meet at a bit of an angle, but only so far as a couple forms back yet, so I'm gonna start by just putting that a little bit of a bevel in there, so I start to form that feet.
Next, I want to put points on these strips so they fit up into the V right there between those two shear strips. I'm just going to get this centered so the intersection here is on the same on both sides, mark that, and that looks like it'll probably be a pretty good fit.
I just need to put a bead on each of those edges, so beads pretty easy to create—just take and knock the corners off, and then knock the corners off the corners. It looks good. So there's some tape curves right here just above the shear line as it's transitioning to the back deck.
With a regular width strip, there's a pretty big gap right back here, so I ended up cutting some half-inch wide strips by just taking one of my regular strips, cutting it to half an inch, by cutting the cove off, and then re-running it through and re-establishing a cove on there, and with these, the narrower strips conform to that shape a little bit better.
Now, I have some extra strips here, and what I'm going to do is fit one of these strips at one end, fit another strip at the other end, and then make a joint someplace here in the middle—just a butt joint. In that way, I can get the fit easily without worrying about the length, and just do the length adjustment by cutting that butt joint in the middle.
I've got a simple little miter box here that I can just use to cut off the end of the strip where I'm going to make the butt joint. It's got a little bit of an angle to it—not much; it's nothing magical about this. It's just by using this, I can get good consistent joints whenever I cut the butt joint, and it's simple, easy to make—just a couple scraps of plywood around a piece of wood. Quick and easy.
So, I'm just going to cut off the end of the strip here with this. Now, this end's cut to a known angle, and if I use the miter box on the other piece, it'll cut a matching angle. I cut this over long. That way, I don't have to deal with the excess swinging around there, but I still have room to work. So, now I have a full-length strip here.
Now, the 17-foot strips are long enough to go all the way from the bow to the stern here. The tricky part is I need to fit this end up into the cove and have it exactly the right length. So, when I glue it all in, it's tight there, and it's tight here.
So, I've dry fit it here and put some clamps, some little clamping jigs on it, to hold it in place while I make some measurements. So, with it fit into the cove all the way down here, I'm gonna take and get this tight in there as far as I can get, and then make a line, just a mark, like that. I tend to use a double line just so it doesn't get confused with other marks I make on the boat.
So, this means when these lines are lined up, it's the right length to fit all the way up in the bow. So, I can now unclamp the whole thing and just work on this end and try and get these joints lined up, get those marks lines. So, I have unclamp the far end, and now I just want to work on getting the length right. So, here, those marks are lined up perfectly right there, but I want to give myself some room for error, so I'm gonna slide it to make it a little bit longer, so I've got about an inch between the marks now. And so the strip's gonna come up to about here.
That's all—I take and lop it off with that blank. Now, I want to fit the taper up into there, so this is where it's going to be when it's lined up. I've got enough length here to work on it a little bit, and so I'm just gonna line this up with the end of the gap here and then see where it's the same width, so I'm just gonna line it up with the end of the gap here and then see where it overlaps the strip on the other side, make a mark there, and then just draw out that taper. It's gonna look something like that.
And I'll take and cut off most of that excess. Now, I want to plane it down to the line.
So, it's down to the line now. I want to bead on there, so I'm going to cut the corner off both corners and then cut the corner off those corners, so I get a pretty good approximation of a bead on there. Light it up and see how it goes into that gap. This is quite a bit of upward curvature here in the end, so it's gonna stress the strip a little bit. I'm sticking it into the cove there and using the cove to help guide it up. It feels pressed up into that cove.
All right, so it's bottomed out here. It's still a bit of a gap there; actually, that's not too bad for a first effort. So, we still have an inch here of excess length in order to make it fit at the other end. So, even though though this is perfect, the length's not perfect, so we've got to trim this down some more. One thing to remember is there's an inch inch difference in length here, that means I want to take an inch off in length here, approximately, so that's going to be cutting this back at the tape or something like that, so I'm not taking an inch off this bevel, I'm taking an inch off the length.
We want to make sure we don't mess up the bevel angle here. Still have a half inch or so to go back here. This fit looks pretty good; maybe a little bit loose up here in the toe, and tight in the heel. Although, if this really sunk down in there, there's a bit of a gap in that, but that's not bad. Just cove in there with the bead up in the cove. That'll be a pretty tight joint. But I just still need to take some length off; that's pretty darn good for length.
It's off by maybe three 30 seconds. Let's go and try and make it fit, so we'll glue it up, staple it in, go on to the next one.
I'm at the point now where the strips coming up the side have reached the edge of the cockpit. As a consequence, I no longer need to have full-length strips going from one end to the other. I can start at the bow, come back to the cockpit, sort of the stern, come up to the cockpit, and leave the cockpit hole open, and makes fitting a lot easier. I don't need to worry about getting the length perfect. I just need to fit the ends and have them overhang the cockpit hole.
There's a little feature line on the back deck, and I actually have it on the front deck also, but it's more subtle on the back deck, where the deck comes up rounded and has a bit of an angle and then flat. I've got that mark right here and here, and on the back deck, it's quite subtle. But I think it highlights the shape of the boat nicely.
And what I want to do is put an accent on that feature line right here, right here. And I'll do the same up at the bow of the boat, but for now I'm just concerned about the back deck.
You see this feature line starts; it's a couple strips away here. Here it's less than a strip, and it continues up to about here. So what I plan to do is just strip over that section, and trim it back, put in an accent stripe, and then I'll continue stripping.
So, I want to do is make sure I've got that feature line covered with strips, and then I'll come back after the glue is dried and reach from that, and put in the accent. So, I'm just going to put in a couple short pieces of strip here, get them glued and stapled and placed, let that dry, and then while I'm working on the foredeck, this should be drying up, and I should be able to come back and trim back that feature line, so I'll come back later, mark this out and trim that off, and then continue stripping on the front deck.
The feature lines a little bit more obvious; you see there's a quite distinct angle right there, but I've got a few more strips before I get there, at least two before I start to get this, and then I'll cover the lower section like I did on the back deck, and then come trim that off, and then continue stripping the deck above that, same on both sides.
So, I'm just looking for strips to run from the point up here back to the cockpit. The cockpit's starting to shorten up here; they're starting to get farther forward.
So, I'll just make sure I step beyond the edge of the cockpit, and I want to make sure I strip beyond the edge of that feature. I put the glue in here; I'm not putting a lot of glue, just enough to get a little bit of squeeze out when I go to put the strip in. I want it dripping out the strength of the boat.
So, I'm up to the point where the strips coming up the side have reached the edge of the cockpit. As a consequence, I no longer need to have full-length strips going from one end to the other. I can start at the bow, come back to the cockpit, sort of the stern, come up to the cockpit, and leave the cockpit hole open, and makes fitting a lot easier. I don't need to worry about getting the length perfect. I just need to fit the ends and have them overhang the cockpit hole.
There's a little feature line on the back deck, and I actually have it on the front deck also, but it's more subtle on the back deck, where the deck comes up rounded and has a bit of an angle and then flat.
I've got that marked right here and here, and on the back deck, it's quite subtle. But I think it highlights the shape of the boat nicely. What I want to do is put an accent on that feature line right here, right here. And I'll do the same up at the bow of the boat, but for now, I'm just concerned about the back deck.
You see this feature line starts; it's a couple strips away here. Here it's less than a strip, and it continues up to about here. So what I plan to do is just strip over that section, and trim it back, put in an accent stripe, and then I'll continue stripping.
So, I want to do is make sure I've got that feature line covered with strips, and then I'll come back after the glue is dried and reach from that, and put in the accent.
So, I'm just going to put in a couple short pieces of strip here, get them glued and stapled and placed, let that dry, and then while I'm working on the foredeck, this should be drying up, and I should be able to come back and trim back that feature line, so I'll come back later, mark this out and trim that off, and then continue stripping on the front deck.
The feature lines a little bit more obvious; you see there's a quite distinct angle right there, but I've got a few more strips before I get there, at least two before I start to get this, and then I'll cover the lower section like I did on the back deck, and then come trim that off, and then continue stripping the deck above that, same on both sides.
So, I'm just looking for strips to run from the point up here back to the cockpit. The cockpit's starting to shorten up here; they're starting to get farther forward.
So, I'll just make sure I step beyond the edge of the cockpit, and I want to make sure I strip beyond the edge of that feature. I put the glue in here; I'm not putting a lot of glue, just enough to get a little bit of squeeze out when I go to put the strip in. I want it dripping out the strength of the boat.
And finally, that's enough for today. That's a long episode. The next episode, we'll finish up stripping up the deck, put an accent at the feature line, and just close up the deck. Maybe we'll get to putting some of the combing in; we'll see how far we get and how long that episode runs.
I didn't expect this episode to go as long, but I figured I'd get all the relevant stuff in in one episode, and the next episode will be something a little bit different.
So if you liked this episode, if you're interested to see what's coming up, subscribe, turn on notifications, hit like—all of that good stuff.
If you'd like to provide some direct support to these videos, my Patreon site will let you contribute a little bit to the production, you know, a monthly amount, a small monthly amount. And I really appreciate it. Every bit helps.
You can also go to my website and buy plans for this design and other sea kayaks, recreational kayaks, row boats, canoes, etc. I have a nice selection of a small car-toppable boats with all of my designs.
And there's really something special about going out on a boat you built yourself. So until the next episode, thanks for watching and happy paddling.


