The Wonders of Bias Cut Cloth
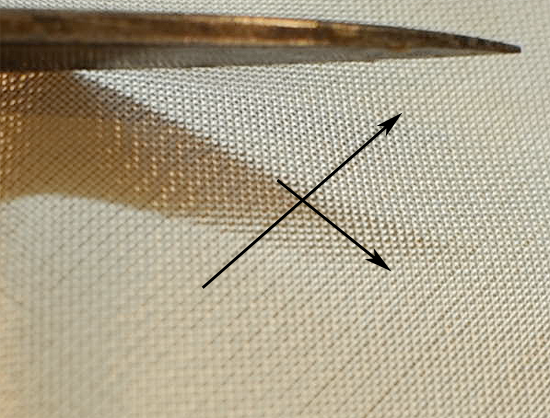
Cutting a strip of cloth at a 45° angle to the weave creates an amazing building material. The magic is created by the fibers running diagonally across the strip which allows the yarns to shift and move, permitting the strip to distort. One edge of the strip of cloth is allowed to be much longer than the other edge. With straight cut strips of cloth where some of the yarns run parallel to the edge, the yarns on the outer edge of a curve would need to stretch to achieve the same effect. Fiberglass doesn't stretch. Cutting the strip diagonally allows the bias-cut material to distort without stretching.
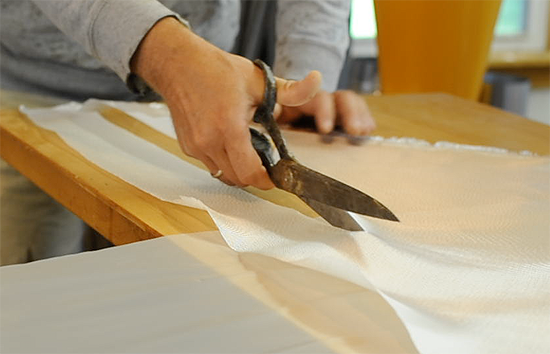
I cut my bias tape directly from the same roll of cloth that I use on the rest of the boat. This is Style 1522, 4 ounce, plain weave, E-glass. Other weights will work, but tight weave fabric does not deform in the same manner. I just use standard scissors to cut strips of the width required.
Closeup Showing the Bias Weave
Wrapping the Coaming
Covering a bunch of wood pieces with a layer of fiberglass transforms a delicate assemblage into a solid form. The trick with the kayak coaming is the shape is quite complicated. The riser is vertical, the lip is horizontal, the whole thing curves in 3 dimensions around the cockpit. We want cloth going all the way around the perimeter while it also wraps from underneath the deck, up the inside of the riser, across, the top of the lip, then down and around to the under side of the lip. Sometimes I will have it continue down the outside of the riser on to the top side of the deck. In this case I already have glass on the riser exterior and deck top.
With straight-cut fiberglass you would have to cut a bunch of darts or slits into the cloth to have any hope of accomplishing this task. These slits would allow yarns of fiberglass to get free from the weave and they would get tangled and messy. Bias-cut tape does not unravel so easily while being manipulated and the results are clean and smooth.
The first step of the process as shown in the video (after cutting the necessary strips) is to apply some resin to the surface you are working on. This serves to hold the cloth in place as you arrange it. Since the bias cut cloth distorts very easily you want to be very careful that you don't tug on the material at all as you arrange it. Any pulling will stretch the cloth in length and make it narrower in width. The pre-wetting of the surface allows you to gently place the cloth and have it stay.
Once the cloth is placed, I dab more epoxy on top of the fabric to continue saturating the weave. I do not stroke the cloth because, again, the cloth distorts very easily, any pulling on the cloth with the brush will stretch the weave and create distortions. We can use this property later, but initially we don't want to distort the weave unintentionally.
I placed the cloth on the vertical part of the coaming riser. I am paying attention to how much is sticking above the riser, as I want enough to wrap across the top of the lip and then wrap below.
After the cloth is placed on the riser, I start folding it across the top by dabbing more resin down and lightly stroking from the riser out across the lip. The fabric needs to be at least partially saturated to stay in place. It will tend to spring back up a bit until it sticks.
Throughout this process I am treating the cloth gently, coaxing it where it needs to be. Overworking the cloth will tend to fray the edges more, as the fabric loses its woven structure it will be harder to control and produce a rougher surface.
Now It Gets Real
Once the cloth is laid down on top of the lip, it is time to wrap it under. Again, the material will not stay in place until the weave is coated with epoxy. The initial process it to get resin on the fabric, so at times you may just be stroking the fabric with a sloppy wet brush to transfer epoxy on to the material. Once it is sufficiently saturated to stick, you can start sticking it underneath with gentle strokes, starting at one end and working incrementally down the length, brushing from the edge in towards the riser. I bent a standard acid brush into an "L" shape to more easily brush the underside of the lip.
If you get wrinkles, try to spread them out, distributing the yarns in the cloth over a wider area. If the edge is too long, such that it needs to start down the face of the coaming riser, it is possible to pull the edge back by brushing inward across the top of the lip and then downward across the inner surface of the riser.
Keep your brush wet so you are getting resin on to the fabric so it will adhere in place. Carefully check that all the fabric is completely saturated. Be mindful of drips, and creating an even saturation with a minimum of thick spots.
When one length of your pre-cut material is completely installed, overlap the next piece about 1 inch (~ 2cm). This will make a high spot that will need some sanding, feathering and fill coating to even out later.
You will notice in the video that I am doing this before applying glass to the inside/underside of the rest of the deck. You can glass the deck interior before doing any work on the coaming, or what I'm doing in this case is continuing to glassing the interior immediately following this coaming process. But for now, once I got all the way around the coaming with the bias strips, I flipped the deck upside-down and folded the, until-now, hanging edge of the fabric onto the interior of the deck and wetting it out.
After completing the saturation process, I squeegee the surface lightly to lift some of the excess resin, and pop any bubbles.