INTRODUCTION
I am now offering these recessed fittings as accessory you can mount on your own kayak. I am also selling the template required to install the fittings.
I originally developed this fitting when I was making a kayak for a museum exhibit. I was not happy with the padeye solution I had been using up to that time. I came up with this idea that provides a robust attachment point, is visually appealing, is designed to be self-draining.
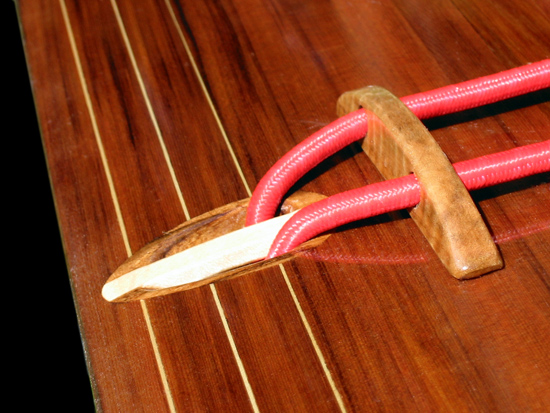
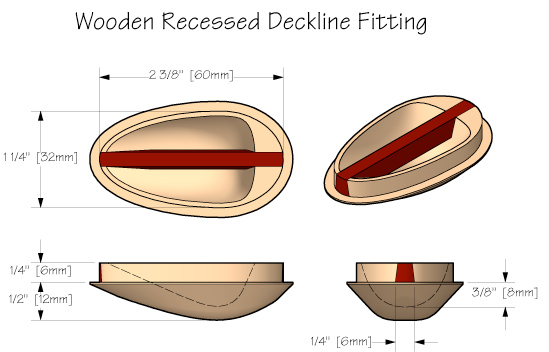
These deck line fittings are intended to allow you to attach a rope or shock cord to the deck. The will accept one or two pieces of approximately ¼” (~6.5 mm) diameter line. They are mounted flush and below the surface level of the deck so that there are no obstructions sticking up. This eliminates some snags for rescue work, makes refinishing easier, and looks nice. They will also accept a loop of 1” webbing.
Deck lines on a kayak can serve a variety of purposes. They can be regular rope or elastic shock cord. They can serve as important safety features, providing something to grab on to should you capsize and come out of the boat, and they can provide a convenient location to stash stuff such as a water bottle, snack, chart, or whatever.
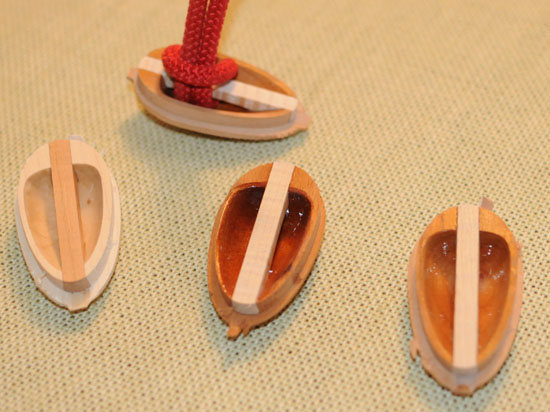
The fittings are carved from hardwood with a CNC machine. The hardwood bar you loop your line under is dovetail shaped to resist pulling out. Properly installed they should be strong enough to lift you kayak.
I typically install these fittings before securing the deck to the hull so I have full access to the interior. The deck may have a light fill coat on the fiberglass.
TOOLS AND MATERIALS NEEDED
1. Plunge Router (Here is a nice Dewalt)
2. 1/8” diameter down-cut straight router bit
3. 3/8” diameter pattern bushing suitable for your router
4. Measuring tools
5. High Quality Fiber Reinforced Packing Tape (1 inch wide)
6. Sandpaper, File and/or Rasp
7. Fiberglass
8. Epoxy
9. Acid Brush
10. Masking Tape
11. Utility Knife
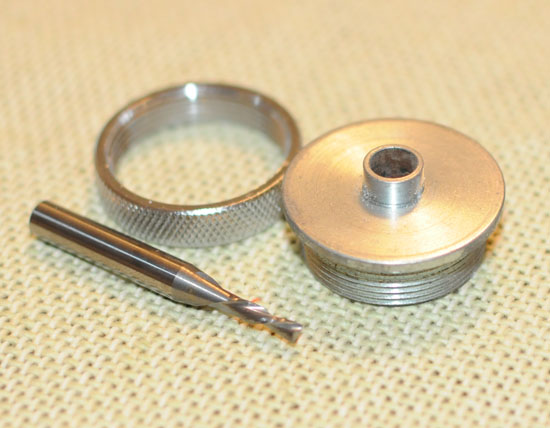
These fittings are installed into egg-shaped holes that are cut using a router with a straight bit, following a pattern. A plunge router is preferred as it provides more control as you initiate the cut. A small tool like a trim-router is easiest just due to weight. However, if you are not currently looking for excuses to purchase new tools, and you already have a router, use what you have. If it is not a plunge router you will need to swing the bit in from the center, then cut around the perimeter.
The down-cut bit pushes material downward as it cuts, instead of pulling up like a standard twist drill. This reduces the chance of delaminating the glass slightly around the edge of the hole with the force of the spinning bit.
Different routers have different systems for pattern bushings. You will need to find the appropriate bushing for your given router.
The epoxy and fiberglass are the same you used to make your kayak. MAS, West System, or the like is appropriate. Four-ounce fiberglass is a good weight as it conforms easily.
Practice! Before you make a mess of your kayak, please test out the system on something less valuable such as plywood.
DECIDE WHERE YOU WANT YOUR FITTINGS
Deck lines can run the gamut from a simple bit of shock cord to hold a water bottle to a comprehensive set of perimeter lines that allow you to grab the kayak anywhere. Your first task is to decide what you want.
The simplest option is to mount two fittings, one on either side, just ahead of the cockpit. A loop of shock cord running back and forth from either side makes a handy place to tuck a bit of gear while on the water.
The full deal would be a series of fittings all the way down on either side where you can run rope from the cockpit up to the bow and back down the other side. Similarly, on the stern. Between the matched pairs of fittings you can run shock cord for storing stuff and for use as a paddle park.
Note that these fitting are intended to be mounted with the bar running vertically up the side, with the narrow end of the egg-shape oriented down, so water drains. However, you may wish to run the bar length-wise in certain configurations.
Note also that it is easier to do all the work below before permanently installing the deck onto the hull. You probably knew that, but if you have some reason to do it differently, that is up to you.
MARK THE LOCATIONS
Once you have your setup figured out, you need to mark the setup on your kayak. I often use a strip of tape as a marking aid. You can use 1” or 2” wide tape to mark a consistent distance from a feature on the kayak. If you want the fittings 3” up from the sheer you can use several strips of tape run parallel to the sheer to create a uniform starting point. With strip built boats you may have staple holes, or stitch hole on a stitch-and-glue boat for length wise location marks. You can either line up your fittings with these marks, or use them to gauge distances. Again some tape on the surface of the boat can make it easier to keep track of location. You can make “+” mark to indicate the center of the fitting location. The hole cutting jig has a horizontal and vertical line that is used for alignment.
PLACE THE HOLE JIG
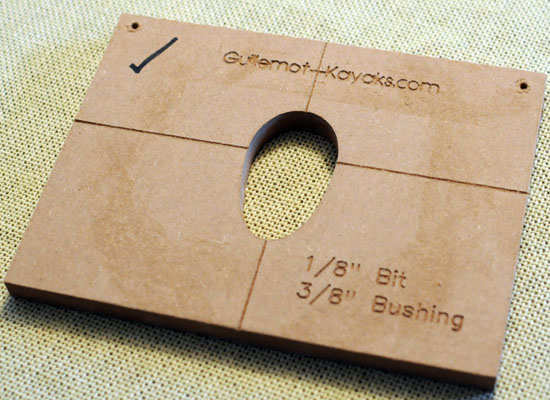
The jig is used to cut the hole in the deck for mounting the fitting. The horizontal and vertical lines on the jig can be used to guide proper alignment. The horizontal line indicates approximately where the rope or cord will run through the installed fitting.
Check that nothing is interfering with the proper placement of the jig. If you are installing the fitting on a highly curved surface you may need some wedges or shims under the jig. You want to keep the jig a close as possible to the surface you will be cutting because small diameter router bits will not reach far beyond the bottom of the jig.
SECURE THE JIG IN PLACE
I have found the best way to hold the pattern in place on the curved decks of kayaks is with copious use of fiberglass reinforced packing tape but other tapes may work as well.
It is a little tricky securing the jig in exactly the right place, be prepared for a bit of trial and error. Cut a length of tape, stick it to the jig with a good length hanging out on either side, and then hold the jig in place while pulling the tape tight as you stick it down.
Check the alignment and use the next length of tape to help refine the location. Pull the tape as tight as possible and burnish the ends down to the boat so they are well adhered.
I usually end up with 2 horizontal lengths of tape, 2 vertical and 4 diagonal, crisscrossing to help reduce any tendency to twist.
Keep in mind that you will need to run the router over the surface of the tape. Therefore, keep the tape flat and un-twisted or folded as it runs over the face of the jig.
Give the template a firm wiggle to be sure it isn’t moving. Double check that the tape is well pressed down. If there is a persistent looseness, you may want to fashion some wedges or shims to slide under the template. A small shift when you press hard shouldn’t be a problem so long as you use a relatively light touch with the router.
ROUTER HOLE
Before you start hacking holes in your deck, install the pattern bushing in your router base. Make sure that it is centered relative to the bit. Install the bit with enough length to reach through the template and then through the thickness of your deck, remembering that your deck likely curves away and will require more length to get all the way through.
Check the movement of your plunge mechanism, adjust the depth stops so you don’t cut too deep.
With the tool turned off and the bit retracted up out of the way, check the motion of the router around the jig. It should move smoothly and without hitches. Make sure you aren’t standing on the power cable.
Looking from the top of your router the bit should spin clockwise, likewise you should run around the template in clockwise motion. This will cause the spinning of the bit to pull the tool tight against the side of the template.
Triple check everything. Is your template in the right place, is the orientation correct (the top is on top?), the collet on your router is tight, the depth stops are set, the router is plugged in, are you ready…
1. Place the router on the template with the bushing in the jig.
2. Bring the tool all the way to the bottom of the jig hole.
3. Start the router.
4. Plunge the bit.
5. Move the router clockwise all the way around the template.
6. Turn off the router.
7. Raise the plunge mechanism.
8. Wait for the tool to stop spinning.
9. Lift the router off the template.
10. Check the results.
You may need to set the bit a bit deeper. You may see you didn’t make a smooth hole because the bushing strayed from the edge of the jig. Make any adjustments and repeat the cut if necessary. Check if the fitting can be inserted into the hole you just cut.
Some adjustment may be required. You can quickly run a finger covered in fine sandpaper around the inside of the hole to remove any fuzz. If more size adjustment is need, it’s easier to work on the fitting itself instead of the hole in the deck.
CONTOUR THE FITTING
Most kayak decks are curved in at least one direction. The fitting is cut with a flange that is flat. This flange needs to be shaped to allow the fitting to be pushed tight against the interior surface of the deck.
I do this work with a file or rasp with a “safe” edge. This means that edge of the tool has no teeth so it will not cut along the side. A cheap way to make such a tool is to take a little strip of wood and glue some coarse sandpaper to the flat face.
First adjust the fit into the hole. If the fitting slides into the hole, you are good, tight is good. The hole should be very close to begin with, avoid doing more than necessary. Check where the fit problem is and work on that part of the fitting, taking light strokes with your file flat against the vertical edge of the fitting. Work gradually into a tight fit, blending away flat spots.
When the fitting can be pressed into the hole, start working on the flange around the fitting. For typical installation you will need to shape down the flange at the top and bottom of the fitting. Hold your file flat against the flange and work it down with smooth stroke. Radically curved decks will require a lot of shaping on the fitting. You may end up completely removing the flange at each end of the fitting. This is OK, there is going to plenty holding the fitting in place when installation is complete.
The goal is to have the flange fit tightly against the inner surface of the deck. Since the fitting will be installed with some thickened epoxy, any small gaps will be filled.
Make sure that the fitting extends completely through the deck. It should protrude slightly on the outside. Shape the flange until the fitting extended all the way through all the way around.
FINISH SANDING THE FITTING
Keep track of where each fitting goes. If the contouring is different for each fitting, you don’t want to put them back in the wrong hole.
The fittings come rough sanded on the back surface. Sand this smooth. Create a smooth transition at the edge of the flange. Clean up and rough spots.
Sand the interior of the deck around the fitting hole out to about 1” (2.5 cm) from the edge.
MASK AROUND THE HOLE.
The installation will happen in several stages, gluing, glassing, and fill coat. For the last two steps we want some masking tape in place on the inside of the deck to contain messes. Mask a rectangle around the hole 1” (2.5 cm) from the edge. Then mask another rectangle about ¾” (2 cm) from the edge, or ¼” smaller than the first rectangle.
GLUE FITTING IN PLACE
Mix up some epoxy according to the manufacturer’s instructions. This is the same epoxy you use for your fiberglassing. Use an acid brush to spread the mixed resin around the edge and flange of the fitting, and brush some on the exposed wood in the hole in the deck. Then add some wood flour to the mixed resin, to make a peanut butter thickness filleting mix. The mix should be loose enough to spread, but not so runny that it drips away.
Place the thickened epoxy in a zip-lock bag or cake decorating bag. Cut the corner off to make a fine dispenser tip. Use this dispenser to apply a bead of thickened epoxy around the edge of the fitting.
Press the fitting into place. You should get some epoxy squeeze-out around the perimeter. When all the fittings are installed, come back and use a gloved finger to clean up the squeeze-out.
Check that the fitting is inserted all the way through the deck.
FIBERGLASS THE INSIDE
Cut some strips of bias-cut fiberglass. Cutting on the “bias” means to cut at a 45° angle relative to the direction of the weave. Cut the strips about 4” (10 cm) wide. Cut rectangles from this strip about 4.5” (11.5 cm) long. These should be big enough to cover the fitting and overlap onto the masking tape. The bias-cut will help the cloth conform of the dome shape of the fitting on the interior of the deck.
Mix up some fresh epoxy. Acid brush the mixed epoxy on to the dome of the fitting and around out to the masking tape. Place the bias-cut rectangular fiberglass patch over the fitting. Use your brush to wet out the fiberglass. Push the fiberglass in towards the fitting to help it conform to the transition around the perimeter.
Let the epoxy set up for an hour or two until the epoxy is a bit leathery. It should no longer be drippy, but before it is really hard.
With a brand new blade in your utility knife, very lightly score the glass around the fitting, about ½” from the edge of the fitting, inside the smaller masking tape rectangle. You can either cut a curved shape matching the egg shape of the fitting, or you can just follow the edges of the masking tape.
Use a very light touch with the knife. You want enough pressure to just cut through the new fiberglass, but not so much that you cut through any prior fiberglass.
When you have cut all the way around, you can peel up the smaller masking tape rectangle. Watch as you peel to make sure the fibers are cut. Hit any persistent fibers with your utility knife.
Mix up another small batch of epoxy and brush on a fill coat over the fiberglass, all the way out the masking tape. When the epoxy has set up enough to stop dripping, peel up the masking tape. Let everything cure overnight or until hard.
CONTOUR THE OUTSIDE
The exterior of the fitting will be made flush the contour of the deck. I often start with a block plane to knock down the highest spots. Then a rasp to bring it down closer, followed by a stiff sanding block to get the fitting flush to the surface. I will then take a random orbital sander to rough up all around the fitting.
We are going to glass over the fitting. To keep from having a high spot in the finished surface around the fitting you can sand into the existing glass on the exterior of the deck around the fitting. In this way the new layer on top will not stick up as far so when you finish sand you don’t sand the new glass completely away.
GLASS THE OUTSIDE.
Use two layers of masking tape around the exterior of the fitting in the same way you did on the interior. The first layer one inch out, the next ¾” out.
In this case we will not use bias cut cloth. We want straight cut cloth, such that the yarns of cloth running the long way run straight up and down the center bar of the fitting. This will provide the maximum reinforcement of the bar.
Mix up a fresh batch of epoxy. Brush some mixed epoxy on to the deck. Work epoxy into the hollow of the fitting. Make sure there is no bare exposed wood anywhere. Be careful to brush out any excess epoxy in the fitting. Dry your brush off before wiping out any excess. Take note of any gap that may remain between the fitting and the deck. Be sure to brush epoxy in to fill gaps as needed.
Stick a patch of fiberglass down on top of the fitting. Align the yarns of the fiberglass with the center bar. Wet down the fiberglass with a little more epoxy until the cloth is fully saturated.
Be careful to not brush too much epoxy into a place where it will run into the fitting. If the fittings are mounted on the side of the deck they should drain out, but more horizontally mounted fittings could fill with drips.
When the epoxy has set to the leathery, rubbery state, trim the excess glass inside the masking tape with a sharp utility knife. Again, take care not to press too hard as marks here will show.
Apply a fill coat over the fiberglass. Again pay attention to avoid filling the fitting with epoxy drips.
Peel the final masking tape when the epoxy stops dripping.
FINISHING
When the epoxy has set, use a utility or x-acto knife to trim the glass that covers the holes into the fitting. Cut carefully around the edges of the holes. Use the knife as a scraper to remove the sharp corner of the glass around the fitting holes. Work a corner of sandpaper down into the holes to relieve the edges.
If there is a blob of epoxy at the bottom of the holes, use your knife to trim out most of it and then use a needle file or needle rasp to clean up any remaining messes.
At this point I would then install the deck on the hull. There may be for fill coats and more sanding. Try not to sand through the fiberglass running down the bar. Try not to fill the holes with epoxy.
When it comes time to varnish you should sand epoxy down inside the fitting. This is a bit of a pain. A little bit of sandpaper on the end of a small stick or Q-tip should rough up the surface sufficiently to assure a good bond.
Varnishing the interior of the fitting can also be accomplished with a Q-tip.
Paddle Safe!


